
For enchanting toy photography, position your toys by a window during golden hours for a magical backlit glow. Use colored gels over lights to infuse your scenes with mood-enhancing hues, such as mystical greens or fiery reds. Create dramatic silhouettes by placing light behind the toys, letting their outlines stand out against a bright background. With these techniques, your photography will tell enchanting stories and there's more to enhance your skills beyond this introduction.
Utilize Natural Light for a Magical Glow
Harnessing the power of natural light can transform your toy photography, adding a magical glow that artificial lighting often can’t replicate. Position your toys near a window during the golden hours—shortly after sunrise or before sunset. The soft, warm light during these times creates stunning backlit effects that highlight details and add depth to your shots. Don’t be afraid to move around and change angles. As you experiment, you’ll notice how the light interacts with each toy’s texture and colors, creating mesmerizing contrasts. Keep your camera settings in check; you might need to adjust the exposure or use a reflector to balance shadows. With practice, you’ll master the art of capturing enchanting images that showcase your toys in their best light. Additionally, consider incorporating various backgrounds to complement your toys when working with natural light. Experimenting with different surfaces, like grass or concrete, can also add unique textures to your images. For further insights, check out these outdoor toy photography lighting tips to enhance your techniques and elevate your photography game!
Experiment With Colored Gels for Mood Enhancement
While natural light offers a soft allure, introducing colored gels can dramatically enhance the mood of your toy photography. Colored gels, placed over your light source, let you infuse your scenes with vibrant hues or subtle tints. Want to create a mystical forest? Try deep greens or purples. For a fiery battle scene, opt for bold reds and oranges. These gels allow you to shape the narrative and evoke emotions effortlessly.
Start by choosing a few primary colors and experiment with layering them. You'll notice how combining different gels changes the overall ambiance. Adjust their intensity by altering the light's distance or power. Don't hesitate to play with angles, as this can result in unique color blends that add depth to your images.
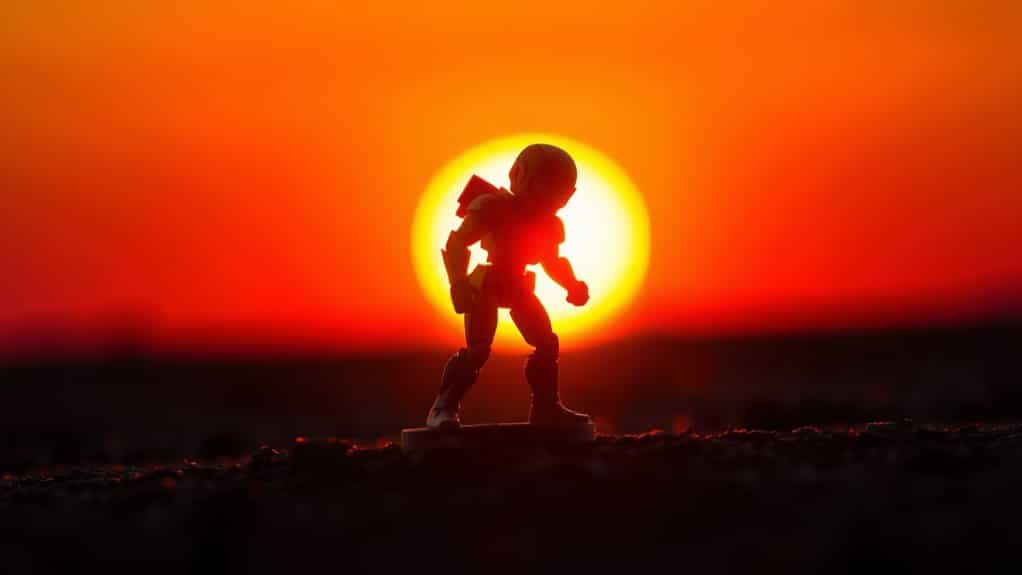
Create Silhouettes for Dramatic Effects

To create silhouettes that captivate, place your light source behind the toy to cast its outline in stark contrast against a bright background. This technique transforms mundane figures into mysterious, dramatic characters. Use a plain, bright background to guarantee the silhouette stands out, conveying emotion without distraction.
Consider these tips to enhance your silhouette photography:
- Adjust exposure settings: Lower exposure to deepen shadows and enhance the silhouette effect.
- Experiment with angles: Change your shooting angle to find the most dynamic silhouette shape.
- Use natural light: Sunrise or sunset lighting can add warmth and depth to your silhouette.
Frequently Asked Questions
What Camera Settings Work Best for Backlighting Toy Photography?
You should set your camera to a low ISO to reduce noise, use a wide aperture for a shallow depth of field, and adjust the shutter speed to balance light. Experiment with exposure compensation for the perfect shot.
How Do I Prevent Lens Flare When Using Backlighting?
You can prevent lens flare by using a lens hood or adjusting your angle to block direct light. Clean your lens to avoid dust spots, and experiment with positioning to minimize unwanted reflections and flares.
What Post-Processing Techniques Enhance Backlit Toy Photographs?
You adjust brightness, you enhance contrast, you boost saturation. Use these post-processing techniques to make your backlit toy photographs pop. Don't forget to sharpen details and reduce noise for that polished, professional look. Your toys deserve it!
How Can I Achieve Balanced Exposure With Backlighting?
To achieve balanced exposure with backlighting, start by adjusting your camera's exposure compensation. Use a reflector to bounce light onto the subject, ensuring the toy's details aren't lost. Experiment with spot metering for precise exposure control.
What Are Common Mistakes to Avoid in Backlit Toy Photography?
Don't let your light source overpower your subject, causing silhouettes. Avoid placing your toys too close to the background light. Confirm your camera's settings are right; otherwise, you'll lose details or end up with lens flare.
At a Glance
Remember, the magic of toy photography often lies in how you play with light. When you utilize natural light, you give your toys that enchanting glow, making them come alive. Experimenting with colored gels can transform your scene's mood, adding depth and intrigue. And don't forget the power of silhouettes for a dramatic flair. As the saying goes, "The devil is in the details." So, pay attention to those lighting nuances, and watch your photos shine.


