

For engaging toy photography in nature, select durable toys with vibrant colors that won't get lost. Take advantage of natural light during the golden hour for warmth, and use diffusers to soften shadows. Find compelling locations in parks or gardens, using natural elements like rocks and plants. Integrate the rule of thirds, and play with perspectives to create dynamic compositions. Experiment with shutter speeds for capturing movement, and refine your shots with careful editing. Discover more insights to elevate your toy photography.
Choosing the Right Toys for Outdoor Photography
When selecting toys for outdoor photography, it is important to take into account their size, durability, and detail. Choose toys that are easy to transport and won't get lost in the vastness of nature. Small toys can be great for close-ups, while larger ones might fit better in expansive scenes. Durability is essential since toys will face rough terrains and weather conditions. Look for materials that can withstand a bit of dirt and moisture.
Detail matters because it adds depth and character to your photos. Toys with intricate designs or expressive features tend to capture more attention. Pay attention to colors, as vibrant toys can stand out against natural backdrops. Always test how your toy interacts with the environment before diving into your shoot.
Utilizing Natural Light for Optimal Results
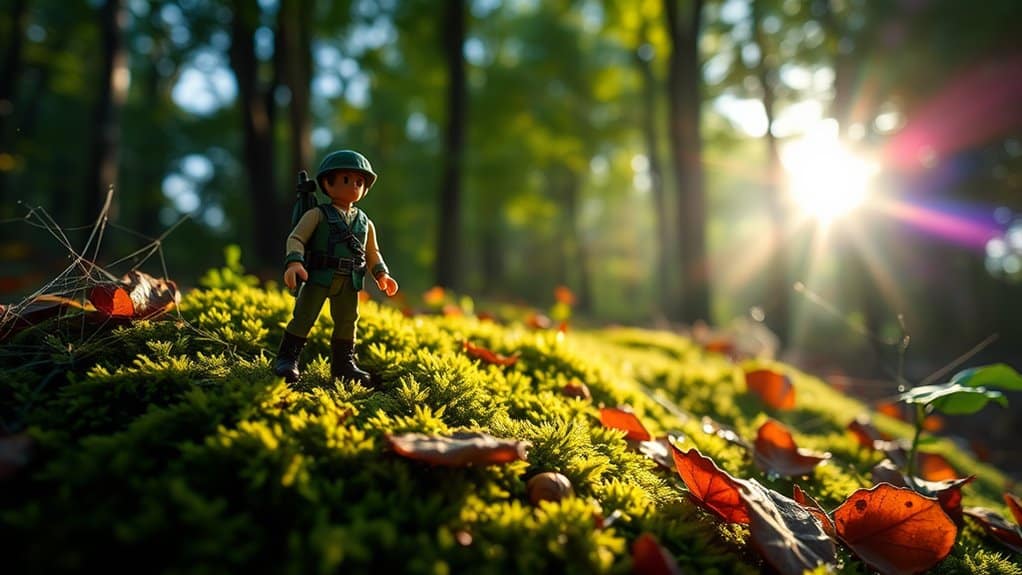
To make the most of natural light in toy photography, take advantage of the golden hour when the sun casts a warm, soft glow. This time helps you create stunning effects without the harshness of midday light. If shadows become too strong, use a diffuser to soften them and maintain a balanced composition.
Golden Hour Advantage
Capturing toy photos during the golden hour can transform your images with stunning, natural light. This magical time, occurring shortly after sunrise or before sunset, provides a soft, warm glow that enhances your toy's colors and details. You'll notice how shadows become longer and less harsh, adding depth and dimension to your shots. To make the most of this opportunity, plan your photography session around these hours.
- Timing: Arrive early to scout locations and set up.
- Experimentation: Try different angles to catch the light perfectly.
- Backdrop: Use the changing sky colors to complement your scene.
- Reflections: Capture water or shiny surfaces to enhance lighting effects.
- Mood: Utilize the golden hour's warmth to convey emotion in your images.
Diffuse Harsh Shadows
While natural light can bring out the best in your toy photography, harsh shadows often pose a challenge. To diffuse these shadows, try shooting on overcast days when the clouds naturally soften the sunlight. If you're dealing with direct sunlight, use a white bedsheet or a translucent reflector to scatter the light. Position it between the sun and your subject to create a more even glow.
Another trick is to utilize a portable diffuser. It's lightweight and easy to carry, helping you maintain soft lighting wherever you go. Experiment with angles and distances to find the perfect balance. Remember, the goal is to highlight the details of your toys without overwhelming them with stark contrasts. With practice, you'll master using natural light to its fullest advantage.
Finding the Perfect Outdoor Setting

Ever wondered how to transform your toy photography from average to awe-inspiring with the right outdoor setting? It's all about finding that perfect spot where nature enhances your miniature marvels. Start by exploring local parks, gardens, or even your backyard. Look for natural elements that complement your toys, like rocks, trees, or streams. Consider the time of day; golden hour offers soft, warm lighting that's ideal for capturing details. Pay attention to the background, ensuring it doesn't distract from your subject.
Here are some tips to guide you:
- Scout locations: Visit multiple sites and take test shots.
- Check weather: Cloudy days provide natural diffused lighting.
- Incorporate textures: Use leaves, sand, or water for depth.
- Watch for shadows: Avoid harsh, distracting lines.
- Stay patient: Wait for that perfect moment.
Creating a Compelling Composition
To master compelling composition in toy photography, start by applying the rule of thirds to balance your scene visually. Use leading lines to draw the viewer's eye toward your subject, creating a natural pathway through your photo. Finally, enhance your shots by adding depth and perspective, making your toys appear more dynamic and engaging.
Rule of Thirds
Understanding the Rule of Thirds can dramatically improve your toy photography composition. This principle involves dividing your image into a grid of nine equal parts. By placing your toy at the intersections or along the lines, you create a more balanced and engaging photo. Here's how you can apply this rule in your photography:
- Grid Overlay: Use your camera's grid feature to guide composition.
- Focal Points: Position key elements like the toy's eyes or main features on grid intersections.
- Background Harmony: Align natural elements to enhance depth.
- Negative Space: Keep open space in one-third for breathing room.
- Experiment: Break the rule creatively, but understand it first.
Leading Lines
One powerful tool in toy photography is leading lines, which can transform your composition by guiding the viewer's eye through the image. In nature, look for paths, streams, or branches to create these lines. When you position your toy along these lines, it directs attention and adds interest to your photo. You can use lines to lead towards the toy, making it the focal point, or guide the eye from the toy to another element in the background.
Experiment with different line types: curved lines can add a sense of motion, while straight lines offer stability. By incorporating leading lines into your shots, you create a dynamic and engaging experience. So, grab your camera and explore how nature's lines can enhance your toy photography.
Depth and Perspective
When you master depth and perspective in toy photography, your compositions become truly compelling. You create a miniature world that feels alive and dynamic. Start by positioning your toys in a way that enhances their three-dimensionality. Use foreground, middle ground, and background elements to add layers to your scene. Adjust your camera angle to highlight the toy's features and create a sense of scale. Don't be afraid to experiment with different perspectives to find what works best.
- Foreground Elements: Use leaves or rocks to frame your subject.
- Camera Angles: Shoot from low angles for a towering effect.
- Layering: Incorporate multiple objects at different distances.
- Forced Perspective: Trick the eye by playing with size illusions.
- Background Blur: Use a wide aperture to emphasize your subject.
These techniques will elevate your toy photography.
Playing With Perspectives and Angles
Ever wondered how to bring your toy photography to life? Playing with perspectives and angles is the secret sauce. Start by getting down to the toy's eye level. This creates an immersive viewpoint and adds a sense of adventure. Experiment with different angles—shoot from above to highlight surroundings or from below to make toys appear larger-than-life. Don't hesitate to tilt your camera for dynamic compositions.
Use foreground elements to frame your toys, adding depth and guiding the viewer's eye. Changing perspectives can turn a static scene into a vibrant narrative. Remember, the angle you choose tells a story, so let creativity lead the way. Keep experimenting until you find the perfect shot that captures the essence of your toy's world.
Incorporating Natural Elements for Realism
To make your toy photography more realistic, begin by blending your subjects with their natural surroundings. Use natural lighting to add depth and authenticity to your scenes, making them feel more lifelike. Don’t forget to integrate local flora to enhance the setting and create a more immersive experience. Experiment with different angles and perspectives to capture your toys in a way that mimics real-life scenarios. Incorporating elements like shadows and reflections can further elevate the quality of your images. By applying these realistic toy photography techniques, you’ll not only draw viewers into your miniature worlds but also showcase the beauty of your intricate setups.
Blend With Surroundings
Incorporating natural elements into your toy photography can instantly elevate the realism of your shots. By blending your toys seamlessly with their surroundings, you create scenes that captivate the viewer's imagination. Focus on integrating elements that complement the scale and story of your toys. Use textures and colors found in nature to make your scene believable. Place toys within, not just on, the environment.
Consider these tips:
- Use Leaves and Twigs: These can act as jungle or forest backdrops.
- Incorporate Rocks: Rocks add depth and can simulate mountains or boulders.
- Water Features: Puddles or streams can become oceans or rivers.
- Sand or Dirt: Perfect for desert or battlefield scenes.
- Moss and Grass: Adds lushness, simulating alien or fantasy landscapes.
Be creative and let nature guide your storytelling!
Utilize Natural Lighting
Natural lighting is one of the most powerful tools in your toy photography arsenal. It breathes life into your shots, making them feel authentic and vibrant. To take advantage of natural light, shoot during the golden hours—shortly after sunrise or before sunset. These times offer soft, warm light that enhances your toy's details without harsh shadows.
Position yourself so the light highlights the toy's features while casting natural shadows that add depth. Avoid direct midday sun, as it can create harsh contrasts. If it's too bright, use natural diffusers like leaves or clouds to soften the light. Experiment with backlighting to create silhouettes or rim lighting for a dramatic effect. Trust your instincts and practice to master the art of natural lighting.
Integrate Local Flora
While capturing toys in their miniature worlds, integrating local flora can elevate your compositions, adding depth and realism. By blending natural elements with your subjects, you create a believable environment that enhances the story you're telling. Use these tips to seamlessly incorporate flora:
- Choose scale-appropriate plants: Smaller leaves and flowers can fit better with tiny figures.
- Pay attention to color harmony: Match or contrast colors to make your subject stand out.
- Consider texture: Different textures can evoke various moods or settings.
- Use natural frames: Branches and leaves can draw attention to your main subject.
- Experiment with depth of field: Blur the background flora to make your toy pop.
Experimenting With Depth of Field
How do you elevate your toy photography from ordinary to extraordinary? Experiment with depth of field (DoF). By adjusting your camera's aperture settings, you can control what's sharp and what's blurred in your image. Use a wide aperture (small f-number) to blur the background, making your toy the focal point. This technique adds a professional, cinematic quality that draws viewers' eyes directly to your subject.
Try shooting from different angles and distances to see how depth changes the scene. A shallow DoF can make your toy pop against a natural backdrop, while a deep DoF keeps everything in focus, enhancing storytelling through scenery. Practice with various lighting conditions and lens options to discover the perfect balance that complements your toy's unique character and setting.
Capturing Action and Movement
Although capturing action and movement in toy photography might seem challenging, it can infuse your images with energy and dynamism. Focus on creating a sense of motion by experimenting with different techniques. To start, use a fast shutter speed to freeze action, or try a slower speed to blur motion creatively. Position toys at angles that suggest movement, like a superhero leaping or a car speeding. Consider the natural environment around you—wind or water can add life to your scene. Capture multiple shots to select the best one later.
Here are some quick tips to enhance action in your photos:
- Use burst mode to capture multiple frames.
- Play with camera angles for a dynamic feel.
- Incorporate natural elements like wind.
- Experiment with shutter speed.
- Create narrative through toy positioning.
Using Props to Enhance the Scene
Props can transform your toy photography by adding depth and context to your scenes. They help create a believable world for your toys, inviting viewers to immerse themselves in the story you're telling. Start by choosing props that complement your toy's theme. For instance, tiny camping gear can enhance an outdoor adventure scene, while small tools or gadgets can suggest a workshop setting.
Incorporate natural elements like stones, leaves, or water to blend your toys seamlessly with their surroundings. Use props to guide the viewer's eye, drawing attention to your toy's expressions or actions. Experiment with scale to create a sense of wonder or surprise. Remember, props don't need to be elaborate; even simple items can add significant impact when thoughtfully arranged.
Editing Tips for Enhancing Toy Photos
When you're done capturing your toy photos, the editing process can take them from good to great. Start by adjusting the exposure to make sure your image isn't too dark or bright. Play with contrast to add depth and make your toy stand out from the background. Don't forget about color correction; enhancing or altering colors can completely change the mood. Consider cropping your image to better focus on the toy itself and eliminate distractions.
Here are some editing tips to enhance your photos:
- Exposure Adjustment: Balance light and shadows.
- Contrast Enhancement: Make details pop.
- Color Correction: Set the right mood.
- Cropping: Eliminate distractions and focus on the toy.
- Sharpening: Boost details and textures.
These steps will help your toy photos shine with professional quality.
Frequently Asked Questions
How Do I Protect My Toys From Outdoor Elements During Shoots?
To protect your toys during outdoor shoots, use waterproof bags or containers when not shooting. Keep them elevated on a cloth to avoid moisture. Carry a soft brush to remove dirt and clean them afterward.
What Type of Camera Is Best for Toy Photography in Nature?
Balancing creativity with practicality, you'd find a DSLR or mirrorless camera best for toy photography in nature. These cameras offer flexibility and control, letting you capture vibrant details while withstanding the unpredictable outdoor environment.
How Can I Safely Transport My Toys to Various Locations?
Use a sturdy container with padding to protect your toys. Consider a backpack for easy transport. Keep them organized in separate bags or compartments to prevent damage. Always check for weather conditions to guarantee safe travel.
What Are Some Tips for Photographing Toys in Different Weather Conditions?
When life's storms roll in, embrace the challenge. Use waterproof bags for protection, and capture unique reflections after rain. In sunlight, watch out for shadows. Winter's snow offers contrast, so adjust exposure. Adapt and experiment!
How Do I Avoid Disturbing Wildlife While Photographing Toys Outdoors?
Stay quiet and move slowly to avoid startling wildlife. Choose locations away from nests or burrows. Use long lenses to maintain distance. Clean up after yourself, and keep props minimal to prevent disrupting natural habitats.
At a Glance
You've got the tools to elevate your toy photography game in nature, but here's a fun fact to inspire you further: 60% of people say they feel more connected to their childhood when viewing creative toy photography. So, get out there and capture those magical moments! Remember, every click of your camera not only tells a story but also evokes nostalgia and joy in others. Immerse yourself in nature, and let your creativity shine through your lens!


