
To capture stunning figurine details with macro lenses, start by choosing a lens with a 1:1 magnification ratio and a focal length between 90mm and 105mm. Verify your setup on a stable surface and use a simple backdrop to spotlight the figurine. Utilize natural or soft artificial lighting, positioning lights at 45-degree angles to eliminate shadows. Stabilize your camera with a tripod and consider using a timer to avoid shake. Adjust your camera settings with a low ISO and an appropriate aperture for depth. With these steps, your figurine photography will showcase every intricate detail. Explore further to refine your techniques.
Choosing the Right Macro Lens
When you're ready to capture the intricate details of your figurines, selecting the right macro lens is vital. A macro lens allows you to get up close and personal with your subjects, revealing textures and features that are otherwise invisible to the naked eye. You'll want to choose a lens with a magnification ratio of at least 1:1, which means the subject appears life-sized on your camera's sensor. This is essential for highlighting the smallest elements of your figurines.
Consider the focal length of the lens as well. A focal length of around 90mm to 105mm is often ideal, providing a good working distance between the camera and your figurine while still offering excellent detail. It helps you shoot without casting shadows or disturbing your setup.
Don't overlook the aperture. A lens with a wider aperture, like f/2.8, allows more light in, resulting in sharper images with beautiful background blur, emphasizing your figurine. Finally, validate compatibility with your camera body. Check if the lens mounts properly and supports autofocus if you need it. By making informed choices, you'll enhance your photography and appreciate the craftsmanship of your figurines even more.
Setting Up Your Workspace
With the right macro lens in hand, it's time to focus on setting up your workspace for capturing those figurine details. Start by choosing a stable surface to work on, such as a sturdy table or desk. This guarantees your camera remains steady, avoiding any unwanted blurs. Next, consider the backdrop. A plain, neutral background helps highlight the figurine without distracting elements. White, black, or grey backdrops work well, depending on the figurine's colors.
Position your figurine at eye level. This perspective often reveals more intricate details and provides a natural view. You might need a small pedestal or platform to achieve this. Keep essential tools within reach, like tweezers for repositioning small parts or a soft brush for dusting. Arrange your camera and lens carefully, guaranteeing they're aligned with the figurine's focal points.
Organize your workspace to minimize clutter. A tidy area allows you to focus on the task, and it's easier to find what you need. Finally, confirm your space is comfortable to work in for extended periods. A comfortable chair and good posture can make a big difference in your shooting experience.
Optimizing Lighting Conditions
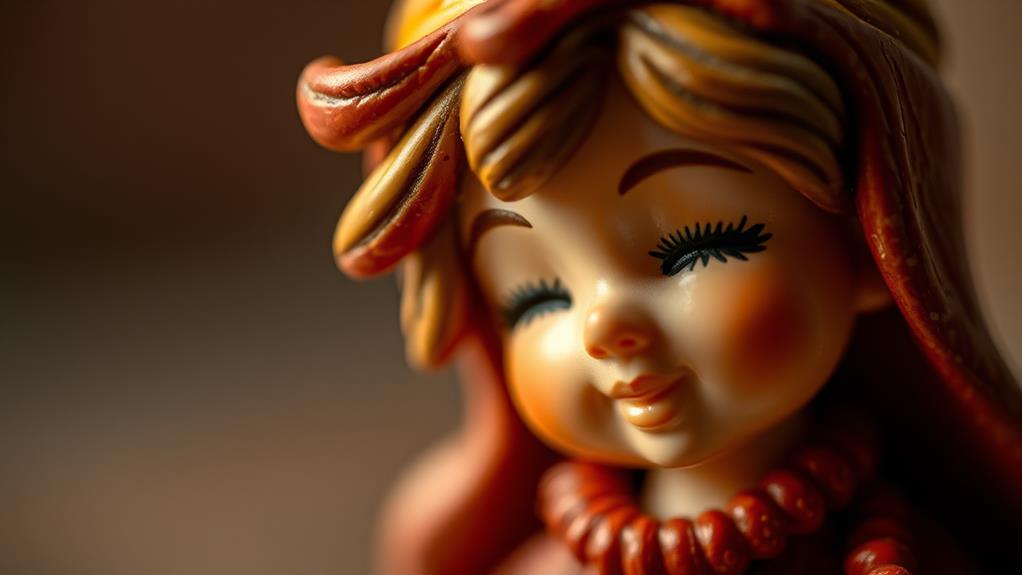
Lighting plays a crucial role in capturing the intricate details of figurines, so it's important to get it right. Begin by choosing a location with ample natural light. If possible, set up near a window where soft, diffused sunlight can illuminate your subject without harsh shadows. Avoid direct sunlight, as it can create unwanted glare and wash out fine details.
If natural light isn't available or sufficient, artificial lighting is your best friend. Use LED lights or softboxes to mimic natural light effects. Positioning is key: place lights at 45-degree angles on either side of the figurine to eliminate harsh shadows and highlight textures. Consider using a third light from above or behind to add depth and separation from the background.
Diffusers can soften the light, reducing harshness and creating a more balanced look. You can use professional diffusers or improvise with materials like white sheets or paper. Reflectors are also useful for bouncing light into shadowed areas, making sure all details are evenly lit.
Experiment with different lighting setups and take test shots to see what works best for your figurine. Adjust as needed to guarantee you capture every intricate detail beautifully.
Stabilizing Your Camera
Capturing every intricate detail of your figurine requires not only impeccable lighting but also a steady hand. Without stability, even the best lighting won't save you from blurry images. Start by investing in a sturdy tripod. It's an essential tool for keeping your camera still, especially when shooting with a macro lens, which amplifies even the slightest movement. Choose a model that's easy to adjust and lock into position.
If a tripod isn't available, try using a flat surface. Set your camera on a stable base such as a table or a stack of books. This will help minimize any shake. Another trick is to use your camera's timer or a remote shutter release. This eliminates the motion caused by pressing the shutter button, ensuring a clearer shot.
Breathing techniques can also make a difference. Before taking the shot, inhale deeply, exhale slowly, and click the shutter during the pause. This minimizes body movement. Finally, consider using image stabilization features if your camera or lens offers them. These can greatly reduce the impact of slight hand movements, enabling you to capture your figurine's details with precision.
Adjusting Camera Settings
Your camera's settings play an important role in capturing the fine details of your figurine. Start by adjusting the aperture. A smaller f-stop number, like f/2.8, creates a shallow depth of field, making your figurine's details stand out against a blurred background. However, increasing the f-stop to around f/8 or f/11 can guarantee more of your subject remains in sharp focus.
Next, consider your ISO setting. Keep it low—around 100 or 200—to minimize noise, which can obscure fine details. Higher ISO settings might be tempting in low light, but they can introduce graininess that detracts from your image's clarity.
Shutter speed is another vital factor. A slower speed, such as 1/60, can capture more light, but it might require a tripod to avoid blur. Faster speeds, like 1/250, can freeze motion, which is useful if you're worried about camera shake.
Lastly, don't forget about white balance. Proper adjustment guarantees colors are true to life, important when capturing the intricate hues of your figurine. Experiment with different presets like daylight or tungsten, depending on your lighting conditions, to achieve the most accurate color representation.
Focusing on Fine Details
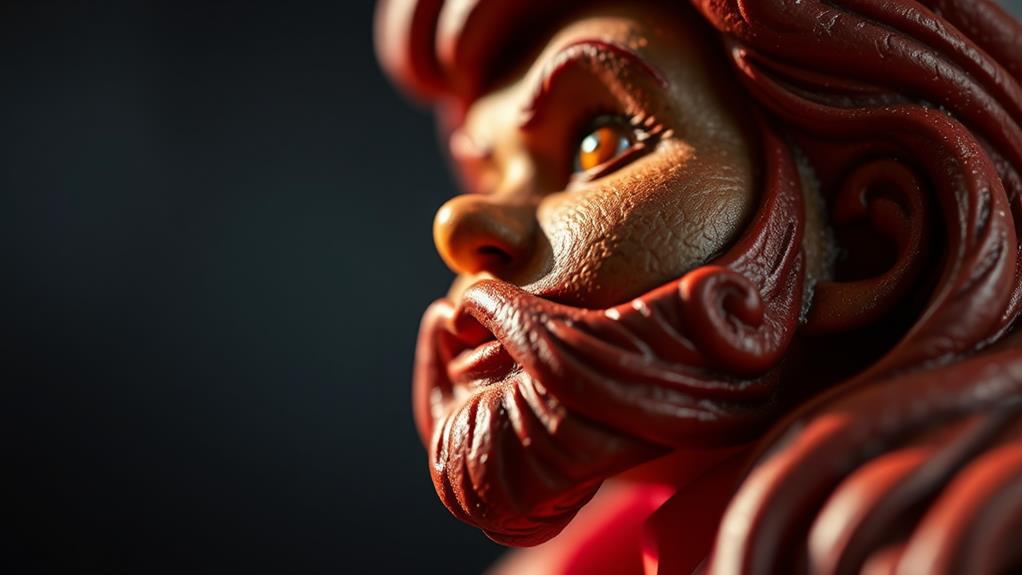
With your camera settings optimized, it's time to shift focus to the intricate details of your figurine. A macro lens allows you to capture the minute textures and features that bring your collectible to life. Start by examining your subject closely. Look for unique elements like facial expressions, patterns, or even tiny imperfections that tell a story. By getting up close, you can highlight these aspects and create compelling images.
To guarantee you don't miss any fine detail, follow these steps:
- Steady your camera: Use a tripod to eliminate any camera shake. Macro photography magnifies even the slightest movement, which can result in blurry images. A stable setup guarantees you capture every detail with precision.
- Use manual focus: Autofocus may struggle with the shallow depth of field in macro shots. Switch to manual focus to have complete control and guarantee the sharpest focus on the desired area.
- Adjust your lighting: Proper lighting is essential. Use diffused light to minimize harsh shadows and bring out the subtleties of textures. Experiment with angles to enhance the details you want to emphasize.
Post-Processing Techniques

Post-processing can be a game-changer when it comes to enhancing the intricate details of your figurine photographs. Once you've captured your images, using software like Adobe Lightroom or Photoshop can elevate them from good to spectacular. Start by adjusting the exposure and contrast to guarantee your figurine's details stand out. Increasing the clarity can help emphasize textures without overdoing it.
Next, focus on the colors. Use the saturation and vibrance sliders to make your figurine's colors pop, but be careful not to oversaturate. You want to remain true to the original colors while making them more eye-catching. Additionally, the hue adjustment tool allows you to fine-tune specific color ranges—perfect for correcting any unwanted color casts.
Don't forget about sharpness. Apply sharpening tools sparingly to avoid making the image look artificial. Zoom in to see how much sharpening your image can handle before it starts losing its natural look.
Frequently Asked Questions
How Do I Prevent Dust From Showing up in Macro Photos of Figurines?
Start by cleaning your figurines thoroughly with a soft brush or compressed air. Guarantee your shooting area is dust-free. Use a microfiber cloth to gently wipe the lens, and consider using a light diffuser to minimize shadows.
What Are Some Common Mistakes to Avoid When Photographing Figurines With Macro Lenses?
Did you know 75% of beginners forget to stabilize their cameras, leading to blurry shots? Avoid this by using a tripod. Don't neglect lighting, and always check your focus to capture sharp figurine details effortlessly.
Can I Use My Smartphone for Macro Photography of Figurines?
You can use your smartphone for macro photography of figurines. Attach a clip-on macro lens for better detail. Guarantee good lighting, steady your hand, and adjust focus carefully to capture the intricacies of your figurines. Additionally, experimenting with different angles can reveal unique perspectives that highlight the craftsmanship of your figurines. For those serious about their macro photography, researching the best closeup lens for smartphones can make a significant difference in image quality. Don’t forget to edit your photos afterward, as simple adjustments can enhance colors and bring out the fine details even more.
How Do I Clean My Macro Lens Without Damaging It?
To clean your macro lens, gently use a microfiber cloth. Avoid harsh chemicals; instead, use a lens cleaning solution if needed. Wipe in circular motions to prevent scratches. Always store the lens in a dust-free environment.
What Are Some Creative Composition Techniques for Figurine Macro Photography?
When you're photographing figurines, try using leading lines to draw the viewer's eye. Experiment with perspectives, like shooting from below. Use negative space to emphasize your subject. Play with reflections or shadows for added depth and intrigue.
At a Glance
So, you've mastered capturing every tiny detail of your figurines with your macro lens. Who knew such small subjects could demand so much attention, right? You've picked the perfect lens, set up your space like a pro, and balanced your lighting as if you were hosting a spotlight show. After all that, you'd think the figurines would just photograph themselves! But hey, at least now you're ready for any miniature challenge that comes your way.


