

To make miniatures appear life-sized, start by ensuring your proportions are spot on, using calipers and reference photos for accuracy. A macro lens, ideally between 50mm and 100mm with a wide aperture, will capture the intricacies. Use diffused lighting and strategically place your light sources to add depth. Choose backgrounds that enhance your miniature's story, whether through natural elements or textured backdrops. Finally, play with depth of field using a wide aperture and position your camera at eye level for realism. Explore these techniques further to immerse your audience in a seemingly life-sized miniature world.
Mastering Scale Techniques
When it comes to mastering scale techniques in miniature art, understanding the principles of proportion is key. You’ve got to pay attention to the minute details that add up to create a convincing illusion of life-sized objects. Start by measuring your subject and translating its dimensions into a smaller, consistent scale. This guarantees each element of your miniature fits perfectly with the others, maintaining a believable representation. Additionally, once your miniature is complete, lighting becomes crucial in highlighting those intricate details. To capture the best representation of your work, utilize editing tips for miniature photography that can enhance colors and textures, making each piece come alive in images. Experimenting with different angles and backgrounds can also help to emphasize the scale and intricacy of your art, allowing viewers to appreciate the craftsmanship involved.
Use tools like calipers and rulers to get precise measurements. Don't underestimate the power of a good reference photo; it helps you capture the nuances of your subject. As you work, always keep the scale in mind, double-checking that every detail aligns with your chosen ratio.
Lighting and shadow play essential roles in maintaining proportion. You can simulate real-world lighting conditions to create depth and realism. Remember, your goal is to make viewers forget they're looking at a miniature. Each shadow or highlight should complement the scale, enhancing the overall effect.
Incorporating texture is also significant. Think about how surfaces reflect light differently and apply this knowledge to your work. With practice, you'll master the art of scale and bring your miniatures to life.
Choosing the Right Lens
Selecting the perfect lens is crucial for capturing the intricacies of your miniature art. When you choose the right lens, you transform tiny scenes into life-sized wonders. Start by pondering a macro lens, which allows you to focus on close-up details without distortion. A macro lens helps you reveal the fine textures and subtle nuances that make your miniatures come alive. Look for lenses with a focal length between 50mm and 100mm, as they offer a balanced perspective without warping the image.
In addition to focal length, think about the lens aperture. A wider aperture (lower f-stop number) offers a shallow depth of field, creating a beautiful blur in the background and emphasizing your subject. This effect, called bokeh, can make your miniatures pop.
Here's what to contemplate when choosing your lens:
- Macro Lens: Essential for capturing fine details.
- Focal Length (50mm-100mm): Provides a balanced perspective.
- Wide Aperture (f/2.8 or lower): Allows for stunning background blur.
- High-Quality Glass: Guarantees sharpness and reduces chromatic aberration.
Lighting for Realism
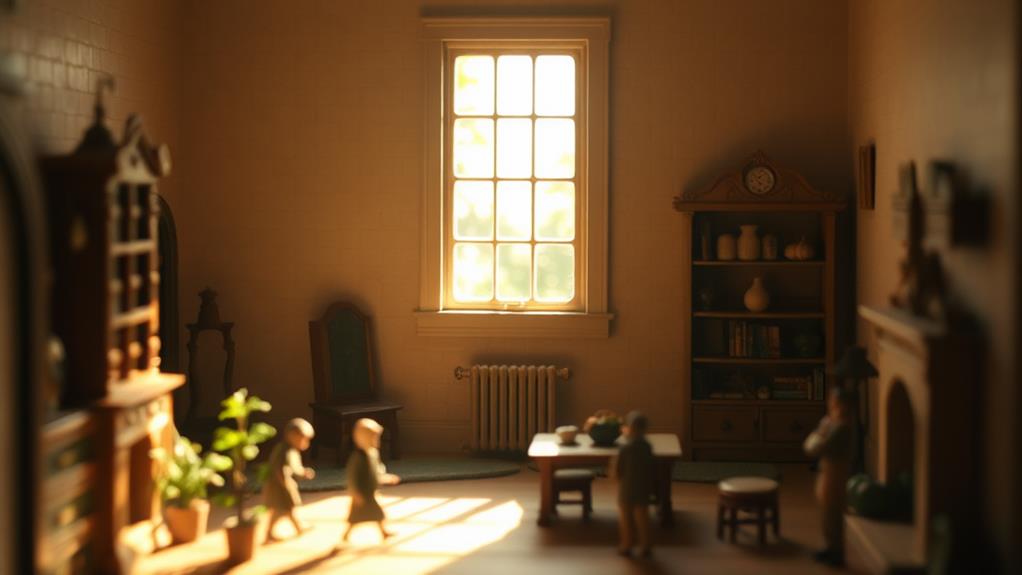
Having chosen the perfect lens, it's time to focus on lighting, the unsung hero that brings your miniatures to life with realism. Start by understanding the significance of diffused lighting. Direct light can create harsh shadows and highlights, making your miniatures look less lifelike. Use a lightbox or create soft lighting by bouncing light off a white surface. This technique will guarantee even lighting and help reveal the intricate details of your models.
Next, consider your light source's color temperature. A warm light, like that from incandescent bulbs, can add a cozy, natural feel, while cooler lights, like daylight LEDs, can make colors pop. Experiment with different temperatures to see how they affect the mood of your scene.
Positioning is vital. Place your light source at an angle to avoid flat, boring images. Side lighting can add depth and dimension, making your miniatures appear more three-dimensional. You might want to try using multiple light sources for a balanced look.
Creative Background Selection
Backgrounds can transform your miniature photography from ordinary to extraordinary. When selecting a creative background, you're setting the stage for your miniatures to shine. Choose wisely, as the right backdrop can create an illusion of life-sized proportions. Start by considering the theme of your miniature. Is it a medieval knight or a modern-day superhero? The background should complement the story you want to tell.
Use textures and colors to enhance realism. A grassy field might suit a knight, while an urban skyline could amplify a superhero's daring adventure. Experiment with different materials like fabric, paper, or printed backdrops to achieve your desired effect. Consistency in style and color between your miniature and background will strengthen the illusion.
Here are a few ideas to spark your creativity:
- Natural Elements: Incorporate small rocks, sand, or leaves to mimic a natural environment.
- Printed Scenery: Use high-resolution images of landscapes, cityscapes, or interiors.
- Dioramas: Craft miniature worlds using model supplies for a custom backdrop.
- Abstract Colors: Utilize bold, abstract patterns to create contrast and highlight your miniature.
With these creative techniques, your miniatures will captivate viewers and appear life-sized.
Perfecting Depth of Field
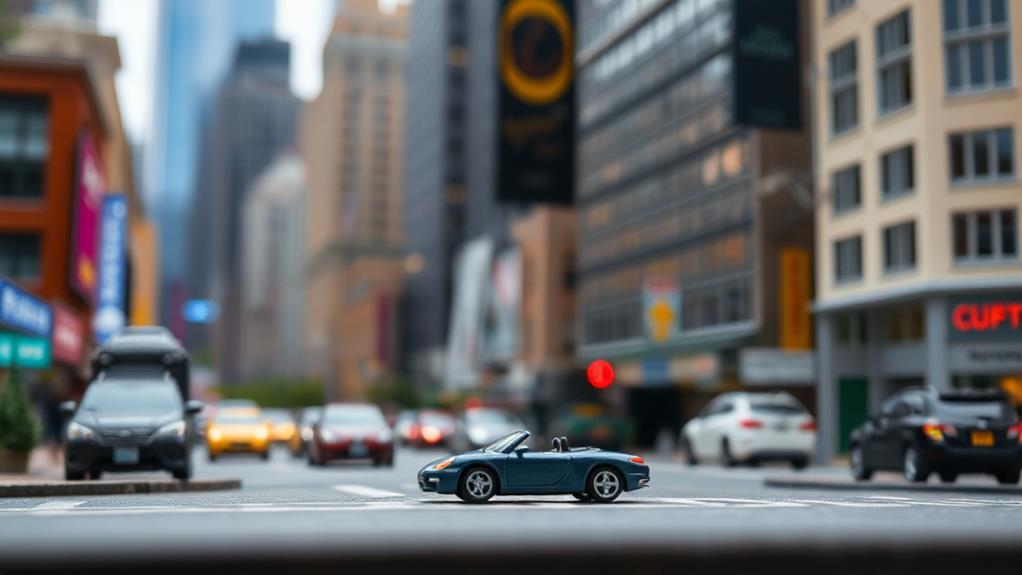
Achieving the perfect depth of field in your miniature photography can drastically enhance the illusion of life-sized subjects. It's all about controlling what stays sharp and what blurs into the background, creating a sense of scale and realism. Start by using a lens with a wide aperture, such as f/1.8 or f/2.8, to create a shallow depth of field. This technique helps focus attention on your miniature while softening the background, mimicking how our eyes perceive large real-world objects.
Position your camera at the miniature's eye level. Doing so not only adds to the realism but also guarantees that your chosen depth of field accentuates the right details. Manual focus is your friend here; it gives you precise control over which part of the scene stands out sharply.
Experiment with your distance from the subject. The closer you are, the shallower the depth of field will be, allowing you to highlight specific features. Conversely, stepping back can increase the depth, capturing more of the scene in focus. Use a tripod to eliminate camera shake, especially with slower shutter speeds, guaranteeing a crisp, clear focal point. With these techniques, you'll transform your miniature scenes into life-sized masterpieces.
Frequently Asked Questions
How Can I Incorporate Movement Into My Miniature Photography?
To incorporate movement in your miniature photography, focus on dynamic poses and angles. Use props to create action scenes. Experiment with lighting and blur effects to suggest motion. Capture multiple shots to enhance the movement illusion.
What Post-Processing Techniques Enhance the Life-Sized Appearance of Miniatures?
Think of post-processing as the magic wand for your miniatures. Use depth of field adjustments, color correction, and shadow enhancements to create a realistic scene. You're crafting a believable world, where every tiny detail tells a story.
How Do I Select Props That Complement My Miniature Scenes?
Choose props that match your miniature's scale and theme. Focus on textures, colors, and materials that enhance realism. Consider lighting and shadows to create depth. Experiment with different arrangements until everything looks harmonious and visually engaging.
Can I Use Smartphone Cameras for Realistic Miniature Photography?
Absolutely, you can use smartphone cameras for realistic miniature photography. With the right lighting and angles, your smartphone becomes a magic wand, capturing life-sized illusions. Experiment with focus and depth, and watch tiny worlds come alive!
What Are Some Common Mistakes to Avoid in Miniature Photography?
Don't overlook lighting; it's essential. Avoid using busy backgrounds that distract. Make certain your lens is clean for sharp images. Steady your camera to prevent blurring. Finally, don't forget to focus properly; details make all the difference.
At a Glance
By applying these techniques, you'll transform your miniatures into life-sized wonders, making them as enchanting as a magician's illusions. Master scale, select the perfect lens, and use lighting to sculpt realism into your scenes. Choose backgrounds that enhance your story, and control depth of field to draw viewers in. With practice, your miniature world will feel as real as life itself, leaving your audience in awe of your creativity and skill. Go ahead, start creating magic!


