
Imagine you're planning to create a miniature city that looks astonishingly real in photographs; the first step is to meticulously envision the layout and theme. Sketch a rough blueprint to visualize where buildings and roads will go, ensuring a cohesive design. You'll need materials like cardboard, foam board, or balsa wood for the structures. But don't stop there—adding realistic textures and weathering effects is vital. How do you bring all these elements together seamlessly and capture the perfect shot? There's a method to achieving those epic photos, and it starts with setting up the scene just right.
Key Takeaways
- Decide on a theme and era to create a cohesive and authentic miniature city scene.
- Use adjustable lighting options like small LEDs to mimic streetlights and enhance photo details.
- Position taller buildings towards the back to maintain perspective and create depth in photos.
- Incorporate realistic textures and weathering effects to add authenticity and visual interest.
- Employ a tripod and high f-stop number to keep the entire miniature city scene in focus.
Planning Your Miniature City
Creating a miniature city requires thorough planning to guarantee every tiny detail aligns perfectly. First, envision the overall layout. Decide on the type of city you want to create—modern, historical, or futuristic. Sketch a rough blueprint to visualize where buildings, roads, and parks will be situated. This helps you avoid overcrowding and certifies a balanced scene. Using tools like Adobe Photoshop can also help in visualizing your layout more effectively. Next, think about scale. Choose a consistent scale for all your elements to maintain realism. Common scales include 1:12 for dollhouse miniatures or 1:87 for model trains. Once decided, stick with it throughout the entire project to avoid mismatched proportions.
Consider the city's features. What kind of buildings will it have? Skyscrapers, houses, or shops? Plan the infrastructure as well—roads, bridges, and public spaces. Don't forget smaller details like streetlights, benches, and signs which add depth and authenticity
Gathering Materials
Once you've planned your miniature city, it's time to gather the materials you'll need to bring your vision to life. Start by compiling a list of essential items like cardboard, foam board, or balsa wood for constructing buildings. These materials are lightweight and easy to manipulate, making them perfect for creating detailed structures. To add an extra layer of creativity, consider the types of backgrounds you might use to enhance the scene.
Next, think about the tools you'll need. A sharp craft knife, ruler, and cutting mat are must-haves. Hot glue guns and super glue are excellent for securing parts together quickly. Don't forget about paint, brushes, and markers to add color and detail to your buildings.
You'll also need materials for the city's infrastructure. Consider using sandpaper for roads, small pebbles for pathways, and tiny pieces of felt or fabric for parks and gardens. Miniature trees and bushes can be crafted from wire and green flocking or purchased from hobby stores.
Scavenge household items too. Bottle caps can become water towers, and old jewelry can transform into city sculptures. Keep an eye out for anything that might add character to your miniature world. With all these materials at hand, you'll be well-equipped to start building your miniature city masterpiece
Crafting Buildings
When crafting buildings for your miniature city, start by selecting materials that are easy to cut and shape yet durable. Certify your buildings are scaled accurately to maintain realism. Incorporating adjustable brightness options can help achieve the perfect lighting for your photos. Pay attention to detailing techniques like texturing and painting to bring your structures to life
Material Selection Tips
Choosing the right materials for crafting buildings in your miniature city can substantially impact the realism and durability of your project. Start with sturdy bases like foam board or balsa wood; they're lightweight, easy to cut, and provide excellent stability. For walls, consider using high-quality cardstock or styrene sheets. Styrene is particularly versatile and can be easily textured to mimic brick, stone, or concrete surfaces.
Don't overlook the importance of adhesives. Use tacky glue for paper components and a strong, quick-setting glue for heavier materials like wood or plastic. Avoid hot glue, as it can be too bulky and may not hold up over time.
For windows and glass-like elements, clear plastic sheets or acetate work well. These materials are easy to cut and install, giving your buildings a realistic touch. To add finer details, use modeling clay or air-dry clay for embellishments like cornices, trim, and other architectural features. Paints are vital too; opt for acrylics because they dry quickly and offer a wide range of colors.
Scaling for Realism
Getting the scale right is crucial for crafting buildings that look realistic in your miniature city. Start by choosing a consistent scale, like 1:87 (HO scale) or 1:64 (S scale), to certify all your buildings and elements match proportionately. Measure actual buildings or use architectural plans, then convert those measurements to your chosen scale. This step guarantees your miniatures don't look odd next to each other.
Use graph paper to sketch your building plans. This helps maintain accuracy and provides a clear guide during construction. Pay attention to the proportions of windows, doors, and other architectural features. If a real window is 3 feet wide, and you're using a 1:87 scale, your miniature window should be approximately 0.41 inches wide.
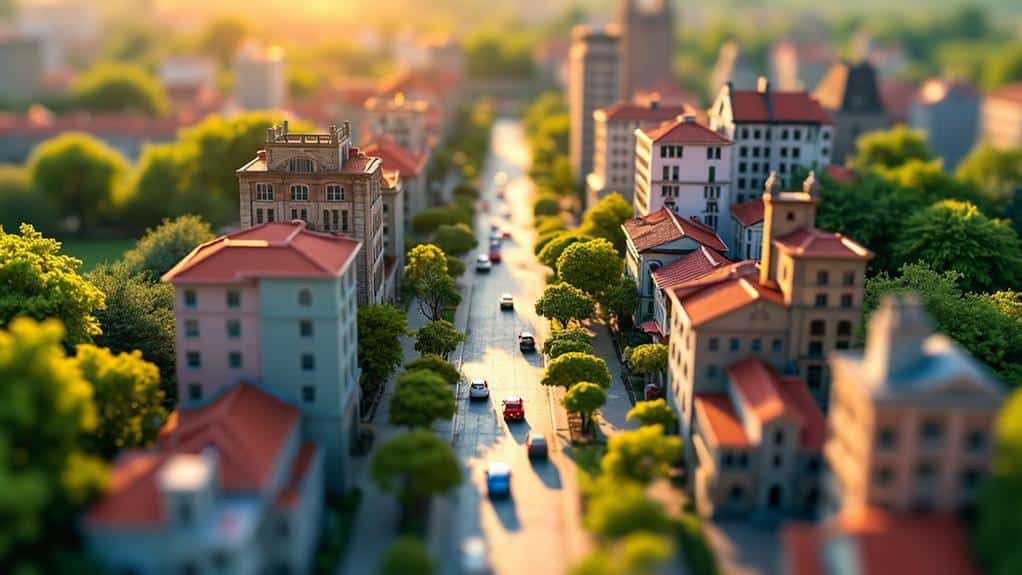
Don't forget the importance of perspective. Taller buildings should be placed towards the back of your scene, creating a sense of depth. Small details like roof angles and the width of sidewalks can dramatically affect realism. Keep your ruler or digital caliper handy and double-check measurements as you go. By keeping everything in proper scale, you'll make your miniature city look impressively authentic.
Detailing Techniques
Mastering detailing techniques is essential for bringing your miniature buildings to life. You'll want to focus on the little things that make your structures look realistic and mesmerizing in photos. Here's how you can achieve that level of detail:
- Textures and Materials: Use a variety of materials like foam board, cardstock, and clay to simulate different building textures. For instance, sandpaper can mimic concrete, while using balsa wood creates a believable wooden texture. This diversity adds depth and realism.
- Weathering and Aging: Real buildings aren't perfect—they show signs of age. Apply washes of diluted paint to create shadows and highlights, simulating dirt and grime. You can also use a dry brush technique to add subtle wear and tear, giving your buildings a lived-in look.
- Tiny Details: Don't overlook the small stuff. Add miniature signs, window frames, and doors to give your buildings character. Incorporate little elements like street lamps, benches, and foliage to complete the scene. These tiny details are what make your miniature city feel alive.
Adding Details and Texture
When adding details and texture to your miniature city photos, focus on the small elements that bring your scene to life. Begin by incorporating realistic textures on your buildings. Use materials like fine sandpaper for concrete and tiny bricks made from polymer clay. Don't forget to add weathering effects—dab a bit of gray paint to mimic dirt or grime on walls and rooftops.
Next, think about street-level details. Add miniature street signs, benches, and lampposts. These elements ground your scene in reality. Scattering small items like newspaper stands or trash bins adds a layer of authenticity. You can even create tiny graffiti decals to give your city an urban vibe.
Vegetation is another important aspect. Use small clumps of moss to represent grass and shrubs. Tiny model trees can be placed along streets or in parks. To add texture to roads, sprinkle fine gravel or use a textured paint to simulate asphalt.
Lastly, consider the people and vehicles populating your city. Miniature figures and cars not only add scale but also bring motion and life. With these detailed touches, your miniature city will look incredibly realistic and enthralling in photos.
Setting Up the Scene
When setting up your scene, start by choosing ideal props that complement your miniature buildings. Carefully arrange the buildings to create a realistic cityscape, considering the scale and spacing. Finally, experiment with lighting and angles to bring your miniature city to life and capture the perfect shot.
Choosing Ideal Props
Selecting the right props for your miniature city photos is crucial to creating a realistic and engaging scene. Think about what makes a city vibrant and bustling: streetlights, park benches, vehicles, and even tiny people. These elements breathe life into your miniature world and make your photos pop.
To choose ideal props, start by considering the theme and era of your city. Are you aiming for a modern metropolis or a quaint, old-town feel? Next, focus on scale consistency. Props should match the scale of your buildings to maintain realism. Finally, look at the materials and colors. High-quality materials and vibrant colors can elevate the overall look of your scene.
Here's a quick checklist to help you:
- Theme and Era: Decide if you want a modern, historical, or fantasy setting.
- Scale Consistency: Verify all props are proportionate to your buildings.
- Materials and Colors: Opt for durable materials and colors that complement your scene.
Arranging Miniature Buildings
Arranging miniature buildings in your scene is a pivotal step that sets the foundation for your entire miniature city. Start by deciding on a theme or story for your city. Whether it's a bustling urban landscape or a quaint village, having a clear vision helps guide your building placement.
Begin with the largest structures, typically positioned centrally to draw attention. Gradually add smaller buildings, creating a natural flow that mimics real city layouts. Use streets or pathways to connect different sections, ensuring logical shifts and accessibility. Place landmarks or focal points at key intersections to add visual interest and guide the viewer's eye through the scene.
Think about layering your buildings to add depth. Position some structures closer to the foreground and others farther back to create a sense of scale. Use elevation differences, like hills or raised platforms, to enhance this effect. Group similar styles or periods together for a cohesive look, but don't be afraid to mix it up for a more eclectic, vibrant cityscape.
Lighting and Angles
Lighting and angles play a pivotal role in bringing your miniature city to life. They can transform your setup from a collection of tiny buildings into a mesmerizing urban landscape. First, focus on natural light. Morning or late afternoon light provides a soft, ambient glow that enhances details without harsh shadows. If you're indoors, position your scene near a window to take advantage of this natural light.
Artificial lighting is your next best friend. Use small LED lights or desk lamps to mimic streetlights or interior lights within your buildings. This adds depth and realism. Experiment with different colors and intensities to see what works best for your city.
Angles are just as essential. Shoot from a low angle to make your buildings appear towering and majestic. This perspective gives your miniature city a grand, realistic feel.
- Low Angles: Creates a sense of grandeur.
- High Angles: Offers a bird's-eye view, ideal for showcasing the layout.
- Side Angles: Provides depth and dimension, perfect for capturing alleys and side streets.
Lighting and Photography Tips
Capturing stunning miniature city photos requires mastering the nuances of lighting and photography techniques. Start by using natural light whenever possible. Position your miniature city near a window to take advantage of soft, diffused sunlight. Avoid harsh midday sun, which can create strong shadows and blow out details. Instead, aim for the golden hours of early morning or late afternoon.
Consider using small, adjustable LED lights to add depth and dimension. You can simulate streetlights, headlights, or even the glow from windows. Experiment with different angles and intensities to find what works best for your scene.
Next, pay attention to your camera settings. Use a small aperture (high f-stop number) to keep the entire scene in focus. This is pivotal for capturing all the intricate details of your miniature buildings. A tripod is essential to eliminate camera shake, especially in low-light conditions. Use a slow shutter speed to allow more light in without compromising image quality.
Lastly, don't forget post-processing. Adjust brightness, contrast, and saturation to enhance the atmosphere. Use software like Photoshop or Lightroom to fine-tune your images, making your miniature city photos truly epic.
At a Glance
You've now got all the tools and tips to build an incredible miniature city for epic photos. Remember, planning and attention to detail are key. Use quality materials, get creative with textures and weathering, and don't forget those street-level details. Set up your scene thoughtfully, play with lighting, and use ideal camera settings. With some effort and imagination, you'll capture stunning photos that make your miniature city come to life. Now, go create your masterpiece! For the finishing touch, consider using the best editing software for miniatures to enhance your photos and bring out the intricate details of your miniature city. With the right editing tools, you can make the colors pop, adjust lighting, and add special effects to really make your creation shine. Don’t be afraid to experiment and have fun with the editing process to truly make your masterpiece stand out. Your passion and dedication will surely shine through in your final photos.


