
To craft realistic miniature scenes for toy photography, focus on scale, materials, lighting, and props to bring your visions to life. Choose the perfect scale to capture every detail, select textures for realism, and illuminate with strategic lighting to set the scene's mood. Incorporate natural elements and dynamic backgrounds for authenticity. Add props and accessories to elevate your setup. There's more to learn about blending these elements for stunningly lifelike scenes.
Selecting the Perfect Scale for Your Miniature Scene
When choosing the perfect scale for your miniature scene, it's essential to contemplate the story you want to tell and the level of detail required. Start by considering the subject matter and the narrative you're capturing. A smaller scale, like 1:48, can create an expansive environment, while a larger scale, such as 1:12, offers intricate detail that brings characters to life.
Think about the size of the figures you're using and how they'll interact with the environment. Will a larger scale showcase their features or do you need more space for dramatic landscapes? Also, factor in your photography equipment. A macro lens might be necessary for smaller scales to capture crisp details. Balancing scale with your vision guarantees your miniature scene is both enchanting and coherent.
Choosing the Right Materials for Realistic Textures
When you're creating miniature scenes, selecting the right materials is essential for achieving realistic textures. You'll want to explore various options, from common household items to specialized hobby supplies, to capture the perfect look. Don't forget about cost-effective alternatives that can still provide impressive results without breaking the bank.
Exploring Material Options
Selecting the right materials is essential for achieving realistic textures in toy photography scenes. You need to explore various material options to create lifelike environments. Consider using natural materials like sand for beaches or small rocks for mountainous terrains. These elements add authenticity and depth to your scenes. Fabrics can mimic grass or foliage when cut and shaped appropriately. Look at felt or faux fur for grassy areas or plush surfaces.
Don't overlook the potential of household items. Aluminum foil can simulate metallic surfaces, while cotton balls work for clouds or snow. Craft stores offer a treasure trove of options, from miniature trees to textured papers. Experiment with different combinations to see what works best for your vision. With the right materials, your miniature worlds will come to life.
Achieving Texture Realism
Creating a convincing miniature scene hinges on mastering texture realism. Start by selecting materials that mimic the textures found in real life. For instance, sandpaper can replicate asphalt or concrete surfaces, while natural sponges can imitate rocky terrains. Consider using cotton for clouds or snow, and fine grit sand to emulate sandy beaches. Remember, each material's texture should align with the scene's scale to maintain authenticity.
Pay attention to the details. Mix various materials, like blending moss and painted foam for realistic greenery. Don't forget liquids; use resin for water effects, creating realistic rivers or puddles. Experiment with different paints and finishes to enhance texture depth, making the scene pop. Your choices will breathe life into your miniature world.
Cost-Effective Alternatives
Crafting realistic textures in miniature scenes doesn't have to break the bank. You can find cost-effective materials that offer incredible texture realism without overspending. Look around your home for everyday items that mimic natural surfaces. For instance, use sandpaper for rough streets or felt to imitate grassy fields. Aluminum foil crumpled up can create rocky surfaces, while coffee grounds work great for dirt or soil. Visit a dollar store for inexpensive craft supplies like foam sheets, which can be cut and painted to resemble anything from wooden planks to stone walls. By thinking creatively and using readily available materials, you can achieve stunning results. Remember, it's all about experimenting and finding what works best for your specific scene and vision.
Lighting Techniques to Enhance Miniature Photography
To bring your miniature scenes to life, focus on how you use light. Utilize natural light for a soft and realistic glow, and experiment with DIY light modifiers to shape and control it. Don't forget about shadows and highlights; they add depth and drama to your tiny subjects.
Natural Light Utilization
While capturing the perfect miniature scene, natural light can be your best ally in achieving stunning results. Position your setup near a window or head outdoors during the golden hours—those magical times just after sunrise or before sunset. The soft, diffused glow minimizes harsh shadows, highlighting the intricate details of your miniatures. Experiment with different angles to see how light interacts with your scene, creating depth and dimension. Move around to find where the natural light best complements your composition. Don't hesitate to use reflectors, like a white poster board or a sheet, to bounce light into darker areas. Keep an eye on the weather, too; overcast days provide even lighting without strong shadows, ensuring a balanced exposure for your miniature photography.
DIY Light Modifiers
Natural light provides a beautiful foundation for your miniature photography, but sometimes you need a little extra control over your lighting environment. DIY light modifiers are perfect for enhancing your scenes. Start by creating a simple diffuser using a white bedsheet or a translucent shower curtain to soften harsh light. Clamp it in front of a lamp or window for a gentle glow. For more directed light, try crafting a homemade snoot with a cardboard tube and aluminum foil. This focuses the light onto specific areas of your scene. You can also use white foam boards as reflectors to bounce light into darker spots. Experiment with these budget-friendly tools to create the perfect ambience and bring your miniatures to life.
Shadows and Highlights
Mastering shadows and highlights is essential for adding depth and drama to your miniature photography. Start by placing your light source at strategic angles to cast dynamic shadows. Use a flashlight or desk lamp to create focused beams, enhancing specific areas. Experiment with diffusers, like thin cloth or paper, to soften harsh shadows and spread light evenly. To accentuate highlights, try reflecting light onto your scene with a small mirror or aluminum foil.
Adjusting the light's intensity can dramatically alter the mood. Dim lighting creates mystery, while brighter light can evoke a more vibrant scene. Always observe how shadows and highlights interact with your miniatures, adjusting as needed. Practice makes perfect, so keep experimenting until you achieve that perfect balance.
Incorporating Natural Elements for Authenticity
To bring a touch of realism to your miniature scenes, incorporating natural elements is key. Start by using materials like sand, soil, or small pebbles to mimic the ground. Moss or tiny plants can add life, creating a lush environment. Twigs and small branches are perfect for replicating trees or bushes. Don't forget about water; a small mirror or clear resin can simulate a pond or stream. Lighting is essential, so use natural sunlight when possible to enhance shadows and highlights, making your scene pop. You'll want to observe how these elements interact in real life to capture authenticity. Experiment with different textures and colors to see what works best in your scene, making each shot truly unique and lifelike.
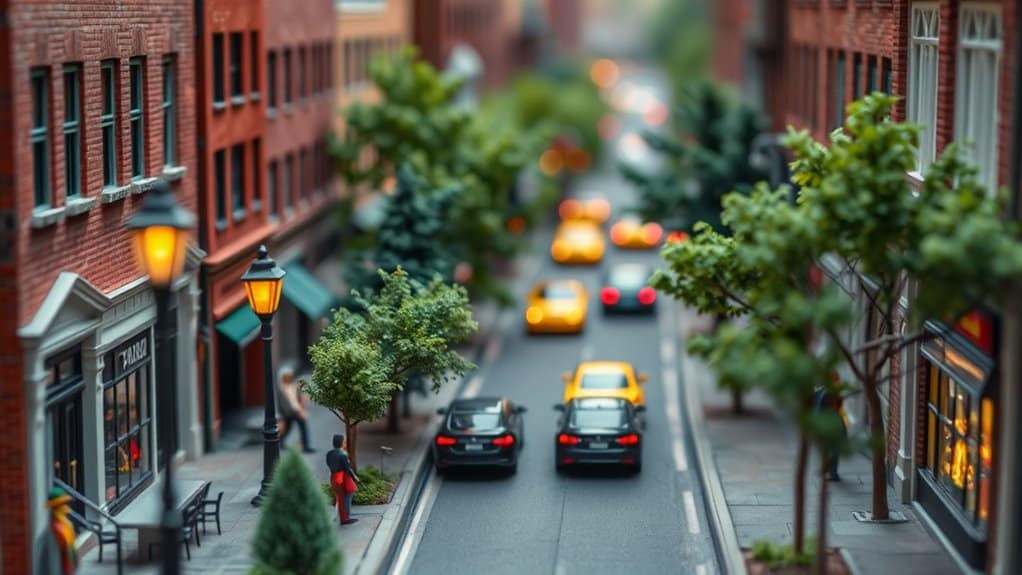
Creating Dynamic Backgrounds With Depth and Perspective

Enhancing the realism of your miniature scenes goes beyond just natural elements; it's also about crafting dynamic backgrounds that offer depth and perspective. Start by choosing a backdrop that complements your scene's theme. Use gradient colors or patterned papers to mimic skies or distant landscapes. Incorporate layers by positioning objects at varying distances from the camera to create a sense of depth. Play with lighting angles to cast realistic shadows and highlight different areas, adding dimension to your scene. You can also experiment with forced perspective: place larger objects further back to make them appear smaller or vice versa. This technique tricks the eye, adding a sense of scale and movement. With these strategies, your miniature scenes will captivate viewers and bring your toy photography to life.
Utilizing Props and Accessories to Elevate Your Scene
While crafting your miniature scenes, props and accessories play an essential role in elevating the overall impact. They add depth, context, and a touch of realism to your toy photography. Think creatively and explore everyday items you might already have. The key is to create an engaging story within your scene. Here are some ideas to enhance your setups:
- Furniture: Miniature chairs, tables, or beds create a lived-in feel.
- Nature Elements: Use small rocks, twigs, or artificial plants to simulate an outdoor setting.
- Lighting: Incorporate tiny lamps or fairy lights to set the mood.
- Everyday Objects: Scale down household items like books or kitchenware for added authenticity.
Experiment with different combinations to discover what best complements your subjects.
Frequently Asked Questions
How Can I Prevent My Miniature Scenes From Looking Overcrowded?
Focus on simplicity. Limit the number of elements you include. Create a focal point to draw the eye. Use negative space strategically. Experiment with different arrangements until you find a balance that feels right.
What Are Cost-Effective Alternatives for Expensive Miniature Materials?
Symbolize simplicity with natural elements. You can use twigs for trees, pebbles for rocks, and fabric scraps for textures. Recycle packaging materials for structures, and paint them creatively. Imagination transforms the ordinary into extraordinary without breaking the bank.
How Do I Clean and Maintain My Miniature Scenes?
To clean your miniature scenes, gently use a soft brush to remove dust. For maintenance, store them away from direct sunlight and humidity. Regularly inspect for damage, and repair any issues promptly to guarantee longevity.
Can Miniature Photography Be Done Using a Smartphone Camera?
So you think your smartphone's too basic for miniature photography? Surprise! You can capture those tiny worlds with it. Just focus on lighting, angles, and creativity. Who knew your phone could rival a professional camera?
How Do I Avoid Glare and Reflections in Glass Miniature Props?
To avoid glare and reflections on glass props, use a polarizing filter on your camera or phone. Position your light source at an angle, and diffuse it with a softbox or a white sheet for even illumination.
At a Glance
You've now got the tools to create stunning miniature scenes that captivate viewers. Remember, choosing the right scale and materials makes all the difference. Did you know that 73% of successful toy photographers believe lighting is the key to realism? By incorporating natural elements and dynamic backgrounds, you can add depth and authenticity. Don't forget to use props and accessories cleverly—they're the icing on your miniature cake. So, grab your camera and start crafting your masterpiece!


