

You can enhance your miniature scenes with dramatic composition by focusing on several key techniques. Start with mastering scale and perspective by placing larger objects in the foreground and smaller ones in the background to create depth. Use leading lines, such as paths or creases, to guide the viewer's gaze to focal points. Incorporate layers to add dimension, ensuring there's a balanced interplay between foreground, middle ground, and background. Experiment with light and shadow to set mood and highlight features. Finally, employ dynamic poses and smart framing to boost narrative and engage attention. Discover how these elements can transform your miniatures.
Mastering Scale and Perspective
To master scale and perspective in miniature scenes, you need to understand how these elements interact to create a believable world. Start by considering the size of each component in your scene. When you're setting up, guarantee that each object is proportionate to the others. For instance, a tiny chair shouldn't overshadow a couch, and a car should fit comfortably on a miniature street. This attention to proportion makes your scene appear realistic.
Next, focus on perspective. You want to create depth that draws the viewer in. Position larger objects in the foreground and smaller ones in the background. This technique mimics how we perceive distance in real life. Your scene should guide the eye naturally, allowing viewers to explore every detail as if they were there.
Lighting also plays a key role. Use it to enhance the depth and emphasize key elements. Shadows can add dimension, while highlights can make certain features pop. Remember, your goal is to immerse the viewer fully. By carefully crafting scale and perspective, you're setting the stage for a miniature scene that's both compelling and convincing. Pay attention to these details, and your scenes will truly come alive.
Utilizing Leading Lines
When composing miniature scenes, leading lines are a powerful tool to guide the viewer's eye through your creation. They help establish a visual path, pulling attention to focal points or specific details you want noticed. In miniature scenes, these lines can be anything from pathways, fences, or even shadows that direct the viewer where you want them to look.
To effectively use leading lines, start by identifying the main subject or area you want to highlight. Once you've chosen your focal point, arrange elements in your scene to naturally guide the viewer's gaze towards it. For instance, a winding road or a row of trees can lead directly to a key feature, making the scene feel cohesive and intentional.
Experiment with different orientations for your leading lines. Diagonal lines often add dynamic energy and movement, while horizontal or vertical lines can create stability and order. Don't be afraid to try unconventional elements as leading lines, like a stream of light or the edge of a shadow.
Creating Depth With Layers

Just as leading lines guide the viewer's eye, layering elements in your miniature scenes can create a sense of depth and dimension. By strategically placing objects at various distances, you can evoke emotional responses and draw viewers deeper into your tiny worlds. Start by arranging elements in the foreground, middle ground, and background. This layering creates visual interest and gives your scene a more realistic feel.
To achieve this, consider the following:
| Layer | Purpose | Emotion Evoked |
|---|---|---|
| Foreground | Immediate focus, draws attention | Curiosity |
| Middle Ground | Storytelling, adds context | Engagement |
| Background | Sets the scene, adds depth | Serenity |
For instance, place a small figure or object in the foreground to create intrigue. In the middle ground, add larger objects or structures to build context. Use the background to set the scene, perhaps with a horizon or distant landscape. These layers work together, creating a cohesive story within your miniature scene.
Experiment with different arrangements and see how they impact the viewer's perception. By playing with depth, you can transform a simple setup into a mesmerizing narrative that resonates emotionally. Your audience won't just view your scenes—they'll feel them.
Balancing Light and Shadow
In the art of miniature scene creation, mastering the balance of light and shadow can dramatically enhance the mood and depth of your compositions. By using light and shadow effectively, you can guide the viewer's eye, create a sense of mystery, and add emotional impact. When setting up your scene, consider the following:
- Light Source Placement: Position your light source to highlight focal points. A well-placed spotlight can draw attention to the main subject and create intriguing shadows that add dimension.
- Shadow Depth: Adjust the intensity of your shadows to convey mood. Soft shadows suggest calmness or nostalgia, while deep, contrasting shadows can evoke drama and tension.
- Layered Lighting: Use multiple light sources at varied intensities. This technique adds complexity and depth, allowing you to highlight secondary elements without overpowering the main focus.
- Color Temperature: Experiment with warm and cool lighting. Warm light can imbue coziness and intimacy, while cool light often suggests isolation or suspense.
Dynamic Posing Techniques
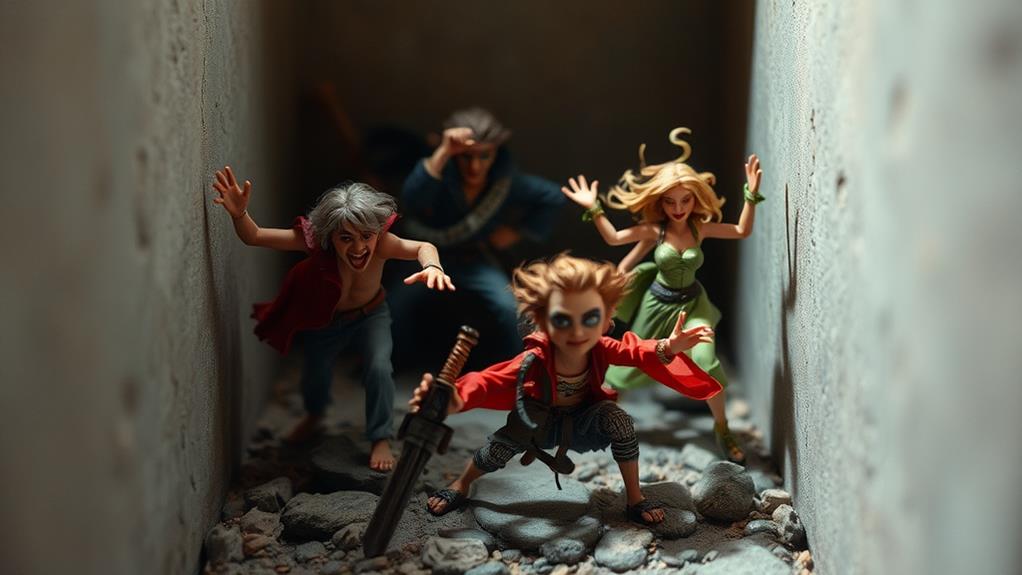
Dynamic posing is essential to bringing life and movement to your miniature scenes. It captures action and emotion, drawing viewers into a tiny world full of stories. To achieve dynamic poses, focus on the balance and tension within each figure. Imagine the character's action or emotion and position limbs to reflect that moment. A figure leaning forward conveys enthusiasm, while one pulling back expresses hesitation or fear.
Think about the weight distribution. A well-posed miniature should feel like it's grounded, even if it's in mid-movement. Angle the torso and limbs to suggest momentum. For instance, a warrior swinging a sword should have a twisted torso, with one foot planted firmly while the other is slightly raised.
Don't forget about the flow. Your poses should guide the viewer's eyes naturally across the scene. Use long lines along the figure's body to create a sense of continuity and energy. Additionally, consider the interaction between multiple figures. How do they relate to each other? A pair of characters engaged in combat should have poses that suggest conflict, with one advancing and the other retreating, creating a visual dialogue.
Framing for Focus and Impact
One key element in creating compelling miniature scenes is framing, which enhances focus and impact. Framing draws the viewer's eye to the scene's focal point, giving your work more depth and meaning. By mastering framing techniques, you can guide your audience's gaze and emphasize important details in your miniatures.
To achieve effective framing in your miniature scenes, consider these four strategies:
- Use Natural Elements: Incorporate elements like trees, arches, or windows to naturally frame your scene. These can guide the eye and create a sense of enclosure, making the centerpiece stand out.
- Play with Depth: Layer different elements to add depth. Place objects in the foreground, middle ground, and background to create a three-dimensional effect that frames your subject and adds visual interest.
- Experiment with Angles: Changing your perspective can dramatically alter framing. Try shooting from below or above to find a unique angle that highlights your scene's focus.
- Lighting and Shadows: Use light to create frames through shadows or highlights. This technique can draw attention to specific areas and set the mood for your scene.
Frequently Asked Questions
How Can I Choose the Right Props to Enhance the Scene's Narrative?
Consider the story you want to tell. Select props that highlight key elements of your narrative. Use items that evoke emotions or symbolize themes. Keep it cohesive by choosing pieces that complement the scene's mood and setting.
What Materials Are Best for Creating Realistic Miniature Backdrops?
You should use materials like foam board, plaster, and textured paper for realistic backdrops. Paint them with acrylics for natural hues. Incorporate details like moss or sand to add authenticity. Experiment to find what works best for you.
How Do I Maintain the Miniature's Details During Post-Processing?
Think of post-processing as walking a tightrope; balance is key. Use subtle adjustments, avoid over-sharpening, and enhance colors carefully. Zoom in to check details, ensuring you maintain the miniature's essence without overwhelming its delicate features.
What Are Some Tips for Transporting Miniature Scenes Without Damage?
Use sturdy containers with foam padding to transport your miniatures. Secure each piece individually and label boxes carefully. Opt for a container with compartments to prevent movement. Always handle with care to avoid unexpected damage during transit.
How Do I Achieve a Consistent Theme Across Multiple Miniature Scenes?
To achieve a consistent theme across multiple miniature scenes, start by defining your theme. Stick to a cohesive color palette and repeat key elements. Use similar materials and textures, ensuring each scene complements the others harmoniously.
At a Glance
You've now got the tricks of the trade to sprinkle a little magic on your miniature scenes. By playing with scale and perspective, guiding the eye with leading lines, and adding layers for depth, you've got the makings of a masterpiece. Balancing light and shadow, along with dynamic posing, gives your creations a breath of life. Finally, frame your work with care to make it pop. Immerse yourself and let your creativity do the talking!


