
Transform your toy photography with these top DIY lighting tips. Use natural light during golden hours, and craft a DIY lightbox for even illumination. Experiment with LED strips for detail, and create soft light using sheer materials. Reflective surfaces can bounce light creatively, while a DIY ring light offers consistent coverage. Harness candlelight for a warm ambiance and play with shadows for dramatic flair. Set up multiple light sources to balance your scene and highlight with color gels for dynamic effects. Dive deeper to discover more about each technique and how they can enhance your toy photography skills.
Use Natural Light Wisely
Harnessing natural light is one of the most effective techniques in toy photography. You can create stunning images by taking advantage of sunlight's ever-changing qualities. Start by identifying the best times to shoot—early morning or late afternoon, known as the golden hours, provide soft, warm light that enhances the details of your toys without harsh shadows. Position your toys near a window or outside in diffused light to avoid direct sunlight, which can create strong contrasts and blow out details.
Be mindful of the direction of the light. Side lighting can add depth and texture, highlighting the contours and features of your toys. If you're aiming for a softer look, backlighting creates a pleasant glow around your subjects. You can also use a sheer curtain to diffuse the light, making it even more gentle and flattering.
Remember to adjust your camera settings to match the lighting conditions. Lower ISO settings help maintain image quality in bright environments, while a higher ISO might be necessary in lower light. Experiment with different angles and distances to see how natural light interacts with your toys, and you'll soon master this essential technique.
Craft a DIY Lightbox
A DIY lightbox is an invaluable tool for toy photographers wanting to control lighting conditions. It allows you to illuminate your subjects evenly, reducing harsh shadows and highlights, which can distract from the details of your toys. You don't need a professional setup to create one. Start by gathering a cardboard box, white tissue paper, and a few sheets of poster board.
First, cut large windows out of three sides of the box, leaving about an inch of border. Cover these openings with the tissue paper, securing it with tape. This will diffuse light, creating a soft, even glow. Next, line the inside of the box with the poster board, curving it from the top back edge to the bottom front edge. This seamless background helps eliminate distracting lines and shadows.
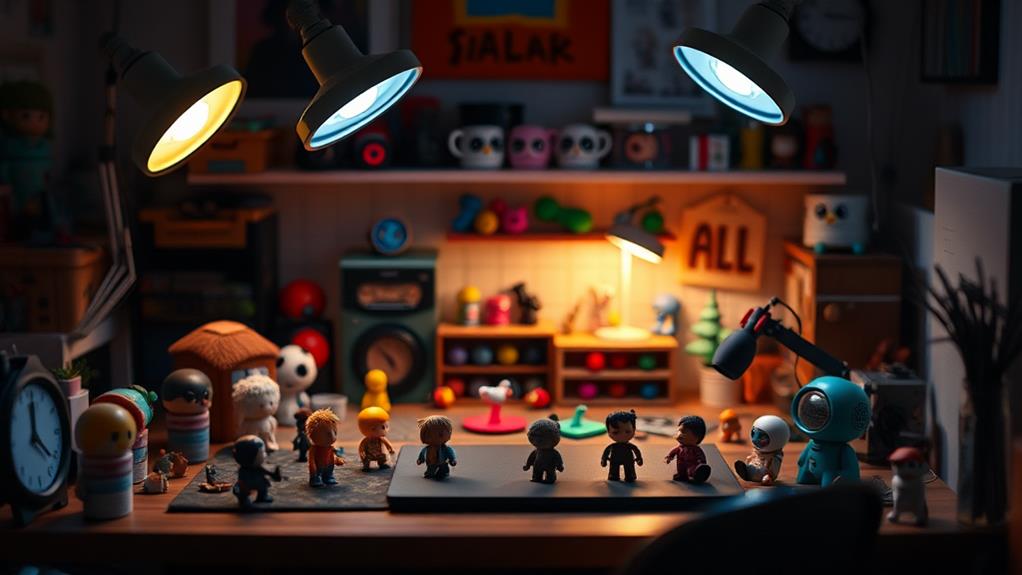
Position your light sources outside the tissue-covered windows. Desk lamps with adjustable arms work well, allowing you to control light direction and intensity. Experiment with different angles to see how shadows and highlights change. With this DIY lightbox, you'll have better control over your photography environment, letting you capture every detail of your toys beautifully.
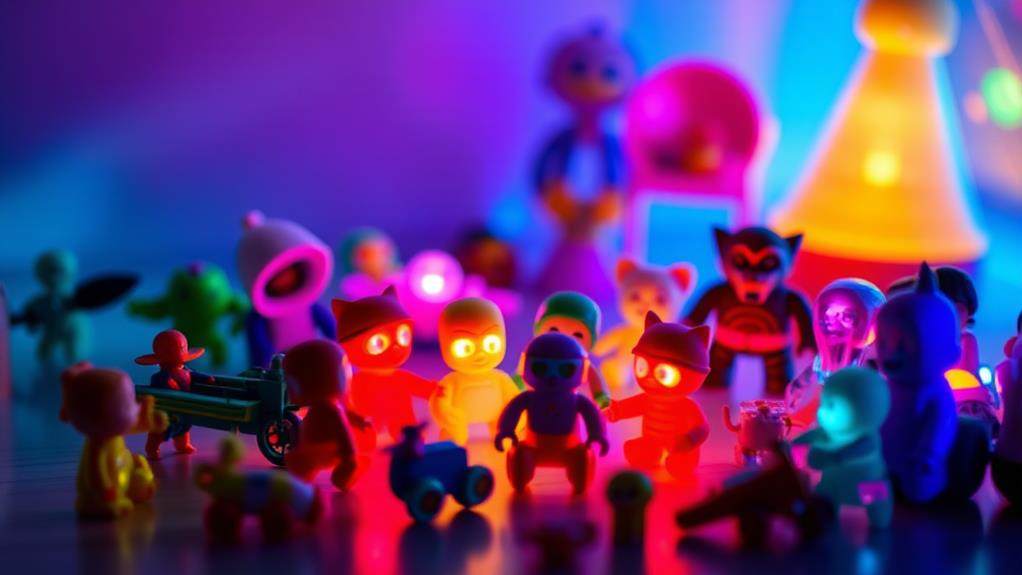
Experiment With LED Strips
Once you've mastered the art of a DIY lightbox, it's time to explore the versatility of LED strips in toy photography. These flexible, vibrant lights can transform your setup and add dynamic elements to your shots. Start by selecting LED strips that offer adjustable colors and brightness. This feature allows you to control the mood and tone of your photos, whether you're aiming for a dramatic scene or a whimsical atmosphere.
Position the LED strips strategically around your toys to highlight intricate details or create interesting shadows. You can attach them to the inside of a display case or wrap them around props to emphasize specific aspects of your composition. Experiment with different angles and distances to see how the light affects your subject.
Don't be afraid to mix colors. Combining hues can create stunning effects and bring your toys to life in unexpected ways. Test combinations like blue and red for a sci-fi vibe or warm tones for a cozy setting. Remember, the goal is to enhance your subject without overwhelming it. Keep adjusting until you find the perfect balance that adds depth and intrigue to your toy photography.
Create a Soft Light Effect
Achieving a soft light effect can elevate your toy photography by minimizing harsh shadows and creating a more natural look. Soft lighting wraps around your toys, highlighting details without harsh contrasts. You might wonder how to accomplish this without professional equipment. Fortunately, there are simple DIY methods to create soft light at home.
- Use Diffusion Material: Grab a white bedsheet, shower curtain, or any translucent material. Place it between your light source and the toy to diffuse the light and soften shadows.
- Employ Natural Light: Position your toys near a window with sheer curtains. This natural diffuser will soften the sunlight entering the room. Mid-morning or late afternoon provides the best soft light.
- Build a Lightbox: Construct a lightbox using materials like cardboard and tracing paper. Cut out windows on each side, cover them with tracing paper, and place lamps outside to diffuse light evenly.
- Adjust Light Position: Move your light source closer or further away. A closer light source will soften edges, while a distant one can create harsher shadows. Experiment with angles to find the sweet spot.
Utilize Reflective Surfaces
When you want to add depth and dimension to your toy photography, employing reflective surfaces can make a significant impact. Reflective materials like mirrors, aluminum foil, or even glossy paper can bounce light back onto your toys, creating intriguing highlights and enhancing textures. By doing this, you can emphasize certain areas of your scene and add visual interest without needing additional light sources.
Start by positioning your reflective surface opposite your main light source. This setup will direct the bounced light onto the toy, illuminating shadows and highlighting details. Experiment with different angles and distances. A minor adjustment can alter the light's direction dramatically, creating various effects. Mirrors work well for a clean reflection, while crumpled aluminum foil provides a more diffused, textured look.
Reflective surfaces also allow you to control the mood and tone of your shot. A subtle reflection can soften harsh shadows, creating a more balanced image. Alternatively, you can use a more focused reflection to draw attention to specific features or create dramatic contrasts. Don't be afraid to get creative! Reflective surfaces offer endless possibilities, so explore and refine your technique to enhance your toy photography.
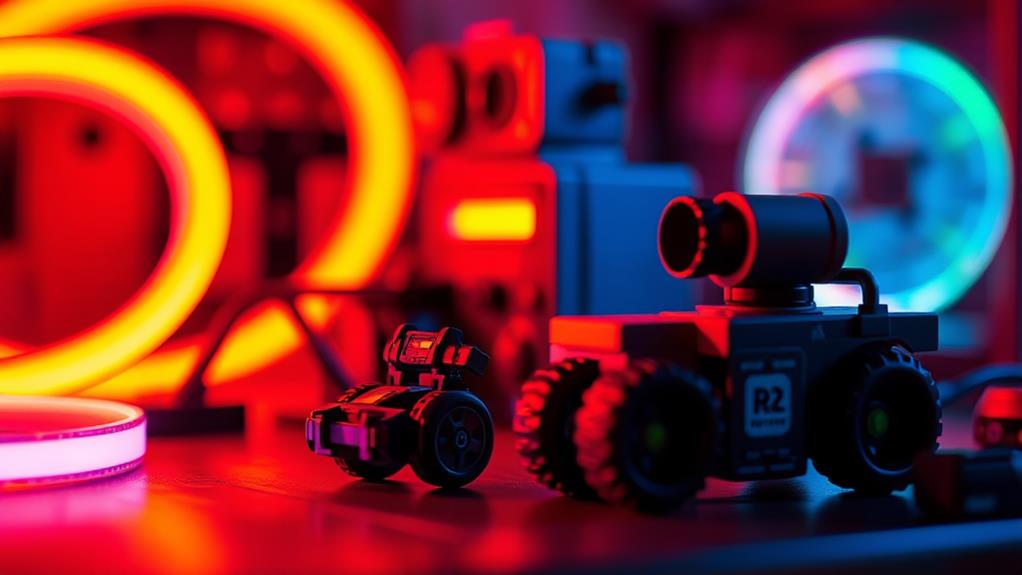
Incorporate Color Gels
Color gels frequently offer an exciting way to transform your toy photography by adding vibrant hues and altering the mood of your shots. By simply placing these translucent sheets over your lights, you can create a diverse range of effects, from dramatic to whimsical. Here are some tips to get you started with color gels:
- Choose Your Colors Wisely: Consider the emotion you want to convey. Reds and oranges can evoke warmth or tension, while blues and greens often create a calming effect.
- Experiment with Layering: Don't hesitate to layer different gels. Combining colors can result in unique shades, giving your photos a creative twist that stands out.
- Control the Light Intensity: Adjust the distance between the light and the subject to control the color's intensity. A closer light source will produce a more saturated hue, while pulling it back softens the effect.
- Use Gels to Create Backgrounds: Cast colored light on a plain surface to create a dynamic background for your toys. This technique can simulate different environments, enhancing the narrative of your scene.
Build a DIY Ring Light
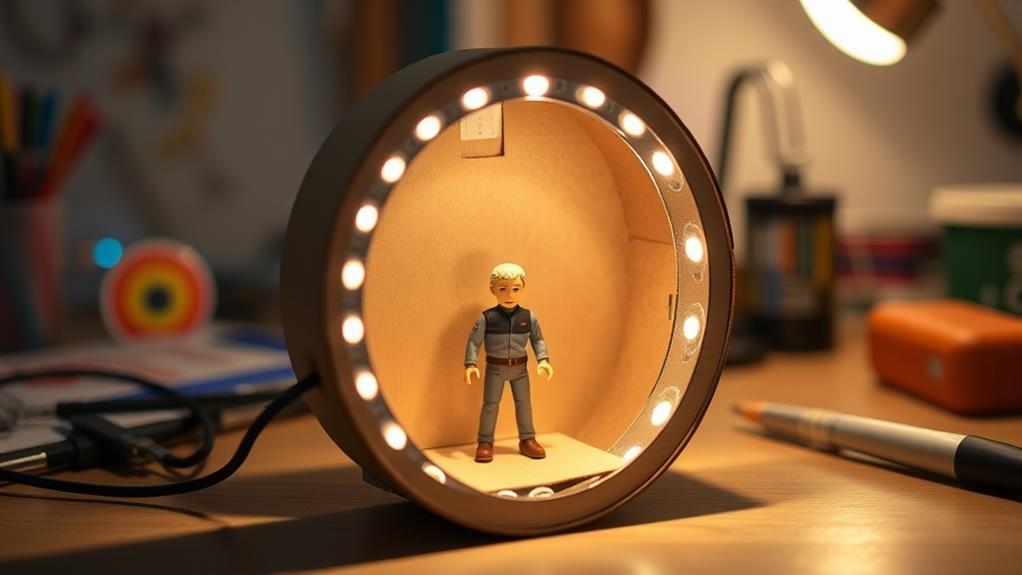
While color gels can add a pop of vibrancy to your toy photography, another tool that enhances your lighting setup is a DIY ring light. Building your own ring light can give you the soft, even illumination perfect for highlighting the intricate details of your toy models. You don't need to break the bank, either. Start by gathering a few materials: a large plastic or metal hoop, LED strip lights, and some sturdy adhesive.
First, secure the LED strip lights around the hoop. Confirm they're evenly spaced, which will provide consistent lighting without harsh shadows. Attach the strip lights using the adhesive, pressing firmly so they hold in place. For power, connect the LED strip to a compatible power source or a battery pack, depending on the type you've chosen.
Position your DIY ring light around your camera lens to achieve the best results. This setup will cast an even light across the subject, enhancing textures and colors. As you experiment, adjust the distance between the light and the toys to see how the shadows and highlights change. With your new ring light, you'll be able to capture stunning, professional-looking shots.
Harness Candlelight
Incorporating candlelight into your toy photography can create a warm and enchanting atmosphere that other lighting sources can't replicate. Candlelight adds a soft, flickering glow that's perfect for bringing your scenes to life. To make the most of this unique light source, consider the following tips:
- Choose the Right Candles: Opt for unscented candles to avoid distractions. Different sizes can create varied light intensities, adding depth to your images.
- Control the Flicker: Use a glass container or hurricane lamp to minimize flickering, ensuring a consistent glow that highlights your toys' details.
- Positioning Matters: Experiment with candle placement. Side lighting can enhance textures, while backlighting can create a magical silhouette effect.
- Adjust Your Camera Settings: Use a tripod to stabilize your camera for longer exposures, and set a low ISO to maintain image quality in low light.
Play With Shadows
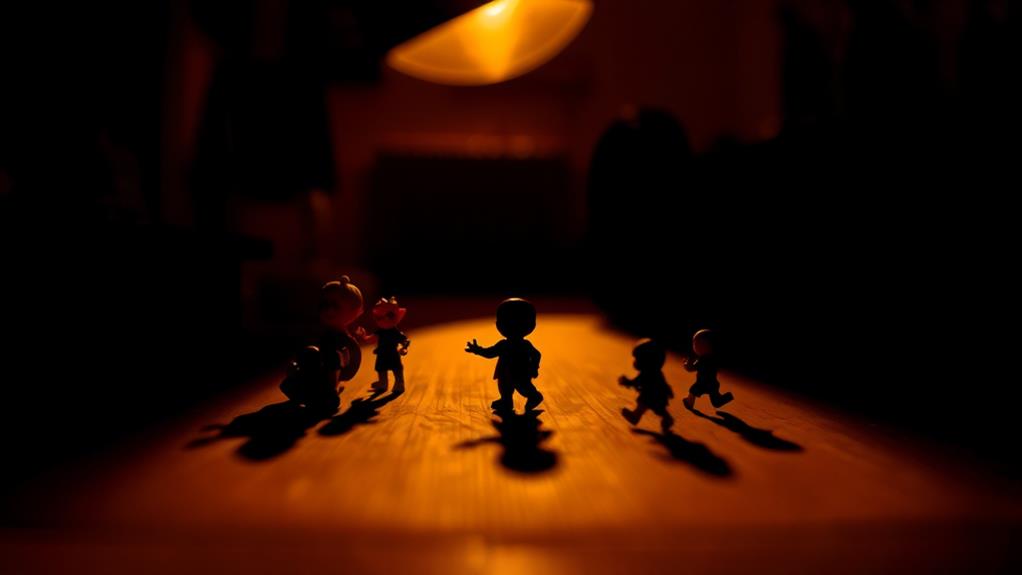
Shadows can add a dramatic flair to your toy photography, transforming simple scenes into enthralling stories. By playing with shadows, you highlight the narrative and add depth to the image. Start by positioning your light source at different angles relative to the toy. This creates varying shadow lengths and directions, letting you experiment with mood and tension.
Use a single light source like a lamp or flashlight to cast strong, defined shadows. Try holding the light closer or further from the toy to see how the shadows change. Sometimes, the shadow itself becomes a character in your story, hinting at unseen elements or emotions. You can also use household items like lace or leaves to break up the light and create intricate patterns in the shadows.
Be mindful of the background, as it plays a critical role in how shadows appear. A plain backdrop makes shadows stand out, while textured surfaces add complexity. Remember to adjust your camera settings, too—change your focus, aperture, or exposure to capture the perfect shadow detail. With practice, you'll find that shadows don't just add darkness; they introduce a new layer of creativity to your toy photography.
Set Up Multiple Light Sources
Adding multiple light sources to your toy photography setup can elevate your images by creating a more dynamic and balanced scene. By strategically placing lights, you can control shadows, highlight details, and add depth, bringing your toys to life in the photos. Here's how to do it effectively:
- Key Light: This is your primary light source, which sets the mood for your photo. Position it to illuminate the main subject, emphasizing the most important features.
- Fill Light: Use a fill light to soften shadows created by the key light. Place it on the opposite side of the key light but at a lower intensity. This balances your scene without overpowering the key light.
- Backlight: A backlight placed behind your subject adds depth and helps separate the toy from the background. This can create a halo effect, making your subject stand out more distinctly.
- Accent Light: To highlight specific details or add color, use an accent light. It can bring attention to unique features of the toy, like textures or accessories, making your photograph more intriguing.
Experiment with these setups to see how different combinations can transform your toy photography into a fascinating visual story.
Frequently Asked Questions
How Can I Prevent Glare When Photographing Toys?
To prevent glare when photographing toys, use diffused lighting by placing a white sheet or softbox over your light source. Position the light at an angle, not directly in front, and adjust until reflections are minimized.
What Camera Settings Work Best for Low-Light Toy Photography?
You're shooting in low light and need ideal camera settings: set a higher ISO, use a wide aperture, and slow shutter speed. Coincidentally, these adjustments will reduce noise and capture details, enhancing your toy photography.
How Do I Reduce Unwanted Reflections in Toy Photos?
To reduce unwanted reflections, adjust your light source angles and use a polarizing filter. Position your toys carefully, ensuring they're not too close to reflective surfaces. You can also diffuse the light with softboxes or DIY diffusers.
What Materials Are Best for Creating a DIY Backdrop?
For a DIY backdrop, use materials like poster board, fabric, or foam board. They provide versatility and ease of use. Choose colors or patterns that complement your toys, ensuring the backdrop enhances rather than distracts from your subject.
How Can I Achieve a Bokeh Effect in Toy Photography?
To achieve a bokeh effect in toy photography, use a wide aperture lens, like f/1.8 or f/2.8. Focus on your toy, ensuring the background is blurred. Position small lights behind for beautiful, out-of-focus highlights.
At a Glance
By exploring these DIY lighting tips, you'll elevate your toy photography to new heights. Don't underestimate the power of natural light or the creative possibilities of LED strips and candlelight. Crafting your own lightbox or ring light can transform your shots, while playing with shadows and multiple light sources adds depth and intrigue. Remember, reflective surfaces and soft lighting effects can enhance your images, making your miniatures truly stand out. Embrace experimentation and watch your creativity soar!


