
To capture thrilling toy photography, employ creative dynamic poses like action-packed jump shots with the toys' legs bent and arms angled. Go for dramatic mid-air freezes using fishing wires, paired with backlighting for depth. Epic battle stances bring out narrative strength, especially with props like swords for dramatic storytelling. Experiment with cinematic perspective angles and mix low-high views for a larger-than-life or vulnerable feel. Expressive character portraits can benefit from soft lighting and eye-level shots. Each technique adds a unique flair and transforms simple toys into scenes with impactful stories waiting to be discovered.
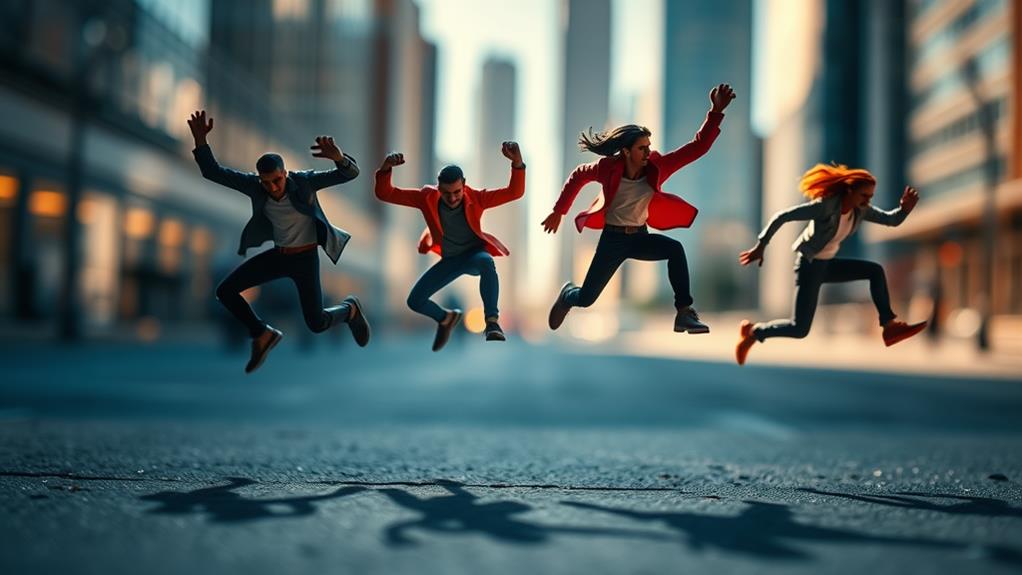
Action-Packed Jump Shots
How can you capture the thrill of movement in toy photography? Action-packed jump shots are your answer. To create these dynamic poses, think about the energy and excitement you want to convey. Start by positioning your toy in a way that suggests upward motion. Bend the legs slightly and angle the arms to simulate a leap. Use a stand or string to suspend the toy in mid-air, allowing you to focus on getting the perfect shot without worrying about balance.
Lighting plays an essential role in making these poses come alive. Use side lighting to highlight the toy's form and create shadows that enhance the sense of movement. A key tip is to experiment with different angles. Shooting from below can give the impression of height and make the jump seem more dramatic.
Don't forget the background. Choose one that complements the action without distracting from it. A blurred background can help focus attention on the toy. Finally, use a fast shutter speed to guarantee that every detail is crisp, capturing the essence of the jump. These techniques will help you convey the excitement of action-packed jump shots in your toy photography.
Dramatic Mid-Air Freeze
Building on the excitement of action-packed jump shots, dramatic mid-air freezes capture a moment suspended in time, offering a unique perspective. To achieve this, you need to focus on timing and positioning. Use fishing wire or stands to give your toys the lifelike illusion of defying gravity. A quick shutter speed helps you freeze the action without blur. Experiment with backlighting for a silhouette effect, or play with shadows to add depth and dimension. You're not just capturing a pose; you're telling a story.
When setting up your shot, consider the emotions you want to evoke. Here's a table to guide you:
| Emotion | Color Scheme | Angle |
|---|---|---|
| Excitement | Bright Reds | Low, Upward |
| Serenity | Soft Blues | High, Downward |
| Tension | Dark Purples | Side, Dramatic |
These elements work together, enhancing the story your image conveys. Consider your background; a simple, uncluttered scene keeps the focus on the toy. Practice makes perfect, so don't get discouraged if you don't nail it on the first try. With patience, mid-air freezes will become a mesmerizing element in your toy photography repertoire.
Epic Battle Stances
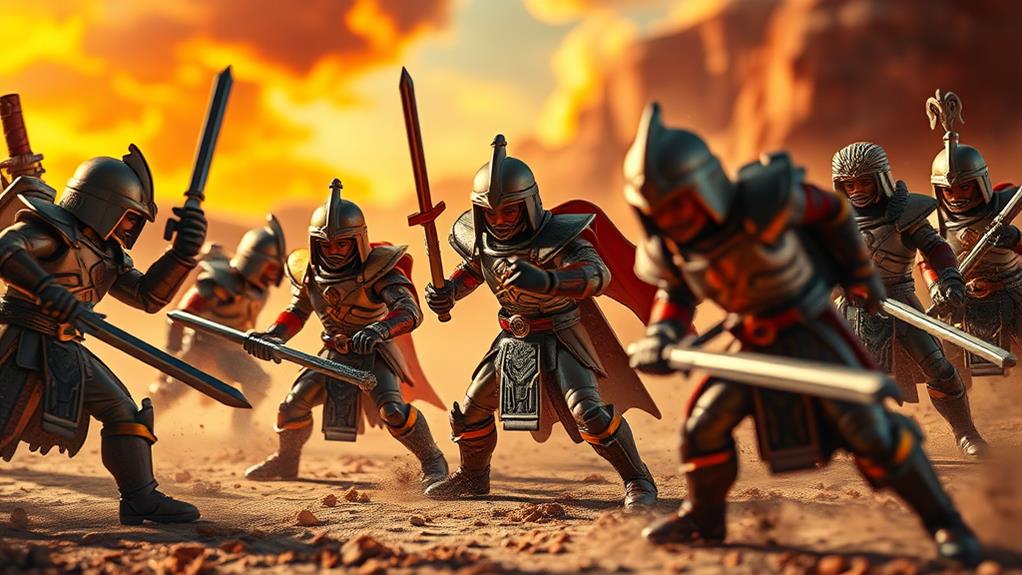
Embracing the intensity of epic battle stances, you can bring your toy photography to life with dynamic power and emotion. Capture the essence of conflict by positioning your figures in poses that convey strength and readiness. Think about the classic warrior stance: feet firmly planted, knees slightly bent, and arms poised for action. This posture not only highlights the figure's musculature but also prepares it for what comes next, creating a sense of anticipation.
To enhance the drama, consider using props like swords, shields, or blasters. Position these items so they draw attention to the figure's intent, whether it's launching an attack or defending against one. Don't forget facial expressions if your toys have them; a fierce glare or determined smirk can add layers to the narrative you're crafting.
Lighting plays an essential role in emphasizing these stances. Use shadows to accentuate the contours and angles of your figures, adding depth and tension. Experiment with backlighting to create dramatic silhouettes or side lighting to highlight textures and details. Remember, each element you include should serve to amplify the story you're telling, making your epic battle stance not just a pose, but a moment frozen in time.
Cinematic Perspective Angles
For a striking cinematic perspective in your toy photography, experiment with angles that evoke a sense of grandeur and scale. By strategically positioning your camera, you can transform simple toys into epic characters worthy of the silver screen. Start by considering the scene's narrative. Are you capturing an adventurous quest or an intense showdown? Let that story guide your choice of angles.
Get close to the subject to emphasize details and textures, giving your toys a larger-than-life presence. Use wide-angle lenses to exaggerate features and create depth, making the viewer feel like they're part of the action. Play with angles that mimic movie techniques, like worm's-eye views or tilted frames, to inject drama and intensity.
Don't hesitate to break traditional rules. Tilt your camera slightly for a dynamic touch, or capture your toys from unique side angles to emphasize movement. Remember, lighting plays an essential role in enhancing these angles. Use shadows to add mystery or highlight certain areas to draw attention. By experimenting with these cinematic perspective angles, you'll create compelling, storytelling images that captivate viewers and elevate your toy photography to new heights.
Captivating Low-High Views

An enchanting way to bring toys to life in your photography is by mastering low-high views. This technique involves capturing your subjects from either a low or high angle, creating a more dynamic and engaging perspective. When you shoot from a low angle, the toys appear larger and more imposing, adding a sense of grandeur or power to the scene. This can be particularly effective for action figures or superhero toys, making them seem like they're towering over the viewer.
On the other hand, shooting from a high angle can make toys look smaller and more vulnerable, perfect for capturing tender or delicate moments. This perspective brings out details that might be overlooked, offering a fresh take on familiar subjects. By experimenting with both angles, you can tell different stories and evoke various emotions.
To achieve enthralling low-high views, try getting down to the toy's level or standing on a chair to gain height. Use a wide-angle lens to enhance the effect, and play with lighting to highlight your subject's features. Remember, the key is to experiment and find what best conveys your creative vision, transforming a simple toy into a compelling character.
Expressive Character Portraits
Capturing expressive character portraits in toy photography opens up a world of storytelling possibilities. You can convey emotions, narrate tales, and add depth to your shots by focusing on the small details that make each toy unique. Start by selecting a character that resonates with you or fits the story you want to tell. Your goal is to make a tiny figure exude emotions that connect with viewers.
To master expressive portraits, consider these essential tips:
- Lighting: Use soft, diffused lighting to highlight your toy's features without harsh shadows. Natural light during golden hour works wonders.
- Angles: Experiment with different angles to find the most flattering and expressive perspectives. Get down to the toy's eye level for an intimate shot.
- Background: Choose a background that complements the toy's expression and doesn't distract from the character. A simple backdrop can often be more effective.
- Expression: Focus on subtle details like the tilt of a head or the angle of arms to convey emotion. Sometimes, less is more.
Frequently Asked Questions
What Equipment Is Best for Capturing Intricate Details in Toy Photography?
You'll want a macro lens for sharp, intricate details. Use a tripod for stability and consistent shots. Don't forget proper lighting—softboxes or ring lights work wonders. A remote shutter release helps avoid camera shake for crisp images.
How Do I Choose the Right Lighting for Different Toy Materials?
You might think lighting's tricky, but it doesn't have to be. First, identify your toy's material: matte, glossy, or transparent. Use soft, diffused light for matte, harsher angles for glossy, and backlighting for transparent materials. Experiment!
What Editing Software Is Recommended for Enhancing Toy Photos?
You should try Adobe Lightroom or Photoshop for enhancing toy photos. Both offer great tools for color correction and detail enhancement. Don't forget to explore free options like GIMP if you're on a budget. Happy editing!
How Can I Create Realistic Backgrounds for My Toy Photography?
Imagine you've got a superhero toy. Use printed cityscapes or natural scenery as a backdrop. Combine layers in Photoshop for depth, and don't forget lighting to match the scene's mood. It makes your shots truly pop!
Are There Any Techniques for Minimizing Reflections on Glossy Toy Surfaces?
You can minimize reflections by diffusing your light source. Use softboxes or white sheets to reduce glare. Adjust angles to prevent direct reflections. Polarizing filters on your camera can also help cut down unwanted shine.
At a Glance
You've explored the art of dynamic toy photography, from action-packed jump shots to expressive character portraits. Remember, an enchanting angle can transform an ordinary scene into a cinematic masterpiece. Did you know that studies show viewers are 67% more likely to engage with images that convey motion and emotion? So, keep experimenting with those epic battle stances and dramatic mid-air freezes. Your creativity can turn small figures into larger-than-life stories, enchanting audiences with every click.


