
When you start crafting unique wooden props for toy photography, making certain to choose the right type of wood is vital. Hardwoods like oak and cherry offer durability, while softwoods like pine are easier to shape. Each wood type brings its own texture and grain, influencing the aesthetic of your photos. But selecting the right wood is just the beginning. How do you confirm your props are functional and visually appealing? And what techniques can elevate your craftsmanship beyond the ordinary? There's much more to explore about transforming simple wood into enthralling props that add depth and realism to your scenes.
Key Takeaways
- Select hardwoods like oak or maple for durable and fine-grained wooden props.
- Sand thoroughly and apply paint or varnish for a smooth, safe finish.
- Sketch designs and verify dimensions to match the scale of toys.
- Use chisels and sandpaper to add realistic textures and details.
- Store props in a climate-controlled environment to prevent damage and ensure accessibility.
Choosing the Right Wood
Choosing the right wood is essential for creating durable and aesthetically pleasing props for toy photography. You want your props to not only look good but also stand the test of time. Start by considering the type of wood. Hardwoods like oak, maple, and cherry are excellent choices because they're sturdy and offer a fine grain, making them perfect for detailed work. Softwoods like pine and cedar are easier to work with but might not last as long.
When considering the wood's finish, remember that a smooth finish is pivotal for ensuring that your props don't have rough edges that could harm your toys or detract from the overall appearance. Sanding the wood thoroughly before applying any paint or varnish will help achieve this. Additionally, the service life of the wood can be enhanced by using high-quality finishes and sealants.
Also, pay attention to the wood's color and grain. The natural look of the wood can add texture and depth to your photos. You might want to keep the wood's natural color or stain it to match the theme of your shoot.
Essential Tools and Materials
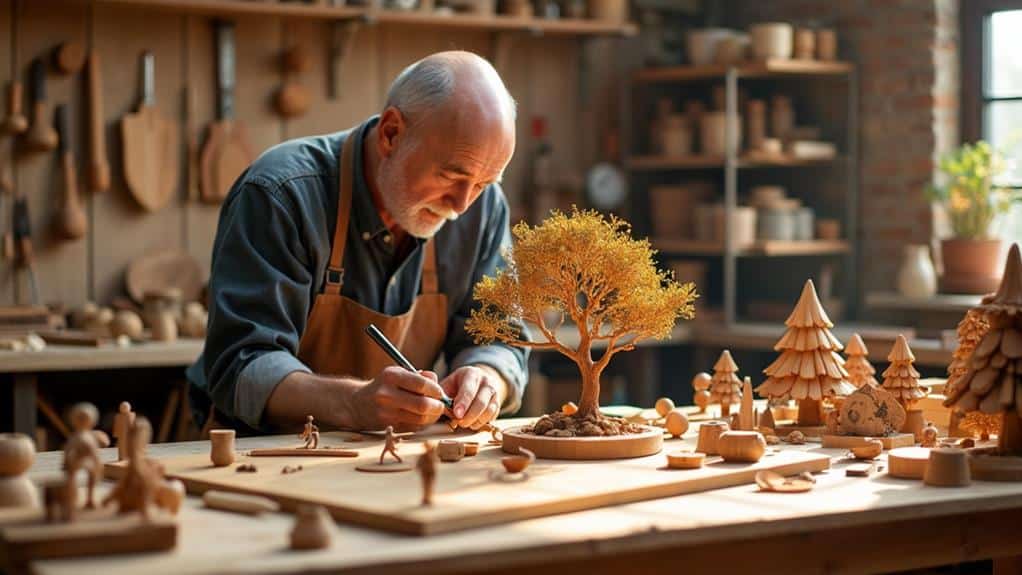
To create wooden props for toy photography successfully, you need the right tools and materials at your disposal. First, gather a variety of tools to shape and detail the wood. Essential items include a handsaw or jigsaw for cutting, chisels for carving, and sandpaper or a sanding block to smooth edges and surfaces. A power drill with different bit sizes will help you create precise holes and intricate designs. For projects requiring intricate lighting, consider using a Foldio Camera app to capture your creations with professional lighting.
You'll also need measuring tools like a ruler, calipers, and a protractor to guarantee accuracy in your designs. Clamps are indispensable for holding pieces steady while you work on them. Don't forget safety gear: goggles to protect your eyes and gloves to keep your hands safe from splinters and cuts.
Regarding materials, start with quality wood. Basswood and balsa are excellent choices for beginners due to their softness and ease of cutting. You'll also need wood glue for assembling pieces and a variety of paints, stains, or varnishes to finish your props and give them character. Brushes, sponges, and rags are useful for applying these finishes. Finally, keep a notebook handy to jot down ideas and measurements as you work
Designing Your Props
Once you've gathered all the necessary tools and materials, the next step is to design your wooden props. Start by envisioning the scene you want to create. Think about the scale, style, and functionality of each prop to guarantee they fit seamlessly into your toy photography. For example, consider how different pieces of lighting equipment, like LED panels or diffusers, might affect the ambiance of your scene.
First, sketch your ideas on paper. This helps you visualize dimensions and shapes better. Don't worry about making perfect drawings; the goal is to get your thoughts out.
Next, consider the following steps:
- Scale and Proportion: Verify your props match the size of your toys. A too-large chair or an undersized table can throw off the scene.
- Detail and Features: Decide on the level of detail. Some props might need intricate carvings, while others can be more simplistic.
- Functionality: Think about how your props will interact with the toys. Will they support weight? Do they need to be movable?
Lastly, refine your designs. Revisit your sketches and make adjustments as needed. The more detailed your plans, the smoother your crafting process will be. Remember, a well-thought-out design is the foundation of a successful prop.
Cutting and Shaping Techniques
Mastering a few basic cutting and shaping techniques is crucial for crafting wooden props that elevate your toy photography. Start with a precise plan. Draw your design on the wood using a pencil and ruler. For straight cuts, a handsaw or a circular saw works best. Always secure the wood with clamps to guarantee safety and accuracy. If you're looking for a lightweight and portable setup for your photography, consider using the AmazonBasics Lightweight Camera Mount Tripod.
For curved or intricate designs, a jigsaw is your go-to tool. Take your time, following the lines carefully to avoid mistakes. If you're working on small details, consider using a coping saw. It allows for more control and precision.
Once you've cut out your basic shapes, it's time to refine them. Use a chisel to remove any excess material and to carve out finer details. A rasp or file is perfect for shaping edges and smoothing out rough cuts. Remember to work slowly and methodically to maintain control over your design.
Always wear safety gear—goggles and gloves are non-negotiable. Keep your tools sharp and in good condition; dull tools can slip and cause accidents. With patience and practice, you'll find that cutting and shaping wood becomes a rewarding and enjoyable part of your prop-making process.
Sanding and Smoothing
Now that you've cut and shaped your wooden props, let's talk about sanding and smoothing them. Start by choosing the right sandpaper grit to eliminate rough edges, making your props safe and smooth. Finally, polish the wood to achieve a professional finish that will make your toy photography stand out.
Choosing Sandpaper Grit
Selecting the right sandpaper grit is essential for achieving a smooth finish on your wooden props. The grit level determines how coarse or fine the sandpaper is, impacting how much material you remove and the smoothness of the surface.
First, start with a coarse grit for initial shaping. You'll want to use 60-80 grit sandpaper to remove rough areas and level uneven surfaces. This prepares your wood for finer sanding.
Next, move to a medium grit to eliminate any scratches left by the coarse grit. Sanding with 120-150 grit paper will smooth out the surface without taking off too much material. This step is pivotal for getting your props ready for detailed work.
Finally, finish with a fine grit to achieve that polished look. Use 220-320 grit sandpaper to make the wood surface feel silky smooth, perfect for close-up shots in your toy photography.
- 60-80 grit: Remove rough areas and shape the wood.
- 120-150 grit: Smooth out scratches from the coarse grit.
- 220-320 grit: Achieve a polished, smooth finish.
Eliminating Rough Edges
After selecting the appropriate sandpaper grits, you'll want to focus on eliminating rough edges to guarantee your wooden props look professional and feel smooth to the touch. Start with a coarser grit, such as 80 or 100, to remove any major imperfections and rough areas. Hold the sandpaper firmly and move it in the direction of the wood grain to avoid scratches and gouges.
Once the rough edges are smoothed out, switch to a medium grit, like 150 or 180. This will further refine the surface and start to give your prop a more polished feel. Continuously check your work by running your fingers over the wood; you should feel a noticeable difference in texture.
Polishing for Finish
Achieving a flawless finish on your wooden props involves more than just basic sanding; it's about precision and patience. Start by selecting the right sandpaper. You'll want to use a range of grits, starting with a coarser one and gradually moving to finer grits.
- Initial Sanding: Begin with 80-120 grit sandpaper to remove any major imperfections and rough edges. This sets the stage for a smoother finish.
- Intermediate Smoothing: Move to 220-320 grit sandpaper to refine the surface. This step reduces scratches left by the coarser grit and starts to bring out the wood's natural beauty.
- Final Polishing: Use 400-600 grit sandpaper for the final touch. This ultra-fine grit makes the wood feel silky smooth and prepares it for any finishing oils or sealants you plan to use.
After sanding, wipe down the wood with a tack cloth to remove any dust. Don't rush the process; each step is vital for achieving a professional-looking prop. Take your time, and you'll see the difference in the final product.
Adding Details and Texture
Now that your wooden prop is smooth, you can focus on adding details and texture to make it more realistic. Start by carving patterns that mimic the grain and knots found in real wood. Then, apply weathered finishes to give it an authentic, aged appearance.
Carving Realistic Patterns
Creating realistic patterns in your wooden props can substantially enhance the authenticity of your toy photography scenes. To achieve this, focus on adding intricate details and textures that mimic real-life objects. Here's how you can get started:
- Choose the Right Tools: Invest in a set of fine carving tools, like chisels, gouges, and knives. These will allow you to create precise patterns and intricate details. A small rotary tool can also be useful for adding texture and depth.
- Study Real-Life Examples: Before you start carving, take a close look at the real-life counterparts of your props. Notice the grain of the wood, the way it splinters, and any unique patterns. This will help you replicate those details accurately.
- Practice Your Techniques: Start with simple patterns and gradually move to more complex ones. Practice on scrap pieces of wood to perfect your technique before working on your final prop. Use a combination of carving, sanding, and scratching to create varied textures.
Applying Weathered Finishes
Transform your wooden props from new to naturally aged by applying weathered finishes that add rich details and texture. Start by lightly sanding the wood to create a worn surface. Use coarse sandpaper to rough up edges and corners, simulating natural wear and tear. Next, apply a wood stain in a darker shade to emphasize grain and imperfections. Wipe off excess stain to avoid an overly dark appearance.
To add more depth, layer different shades of paint sparingly. Dry-brushing lighter colors over dark stains can mimic sun-bleached areas. For a more rustic look, use a combination of vinegar and steel wool to create a natural, aged patina. Soak steel wool in vinegar overnight, then brush the mixture onto the wood and let it dry.
Don't forget to add small details like knotholes or tiny cracks using a fine-tipped wood-burning tool or a craft knife. Seal your work with a matte finish spray to protect the texture and color. This sealing step guarantees your props stay durable without losing their aged charm. By following these steps, you'll craft wooden props that look authentically weathered, perfect for realistic toy photography.
Painting and Finishing
A pivotal step in bringing your wooden props to life is the painting and finishing process. This stage not only adds color and character but also protects the wood, guaranteeing your creations stand the test of time. Start by choosing the right type of paint. Acrylic paints are an excellent choice due to their quick drying time and vibrant colors. Make sure to apply a primer first to help the paint adhere better.
Next, follow these steps:
- Base Coat: Apply a base coat of paint to cover the entire piece. Use smooth, even strokes to avoid streaks and guarantee an even finish. Let the base coat dry completely.
- Detailing: Once the base coat is dry, add details such as shadows, highlights, or patterns. Use fine-tipped brushes for precision, and consider using stencils for intricate designs.
- Sealing: After the paint has fully dried, seal your prop with a clear varnish or sealant. This adds a layer of protection and enhances the paint's longevity. Choose a matte or glossy finish based on your desired look.
Creating Functional Elements
When you're creating functional elements for your toy photography props, start by choosing the right type of wood for strength and workability. Design your props with movable parts for added realism, making sure the joints are smooth and secure. Finally, guarantee durability by using proper construction techniques and finishes.
Choosing Proper Wood
Why is selecting the right type of wood crucial for creating functional elements in toy photography? First, the wood you choose directly impacts the durability and longevity of your props. You want materials that can withstand handling and movement without breaking or warping. Second, different woods offer varying levels of detail and finish, which can substantially affect the realism of your scenes.
When choosing wood, consider:
- Hardwood vs. Softwood: Hardwoods like oak and maple provide strength and durability, making them ideal for structural elements. Softwoods like pine are easier to carve but might not hold up as well under stress.
- Grain and Texture: Woods with fine, even grains like cherry or walnut are excellent for detailed work and smooth finishes. Coarser grains can add texture but may require more sanding.
- Weight and Balance: The weight of the wood affects the balance and stability of your props. Lightweight woods like balsa are easy to handle but might not stay in place, while heavier woods offer more stability but are harder to manipulate.
Designing Movable Parts
In toy photography, designing movable parts for your wooden props can bring a dynamic and lifelike quality to your scenes. Movable joints, hinges, and rotating pieces allow you to create more interactive and engaging setups. You might want a door that opens, a wheel that turns, or even a tiny drawer that slides out. These details can make your photos stand out.
Start by planning which parts of your prop need to be movable. Sketching your design helps you visualize how the parts will fit and operate together. Use small hinges for doors and windows, and consider using dowels or pegs for rotating elements like wheels. For joints, think about using miniature ball-and-socket fittings or small screws that function as pivot points.
Precision is key when cutting and assembling these parts. Verify your measurements are accurate so that the pieces fit snugly and move smoothly. Sand edges to avoid splinters and guarantee a polished finish. Test each movable part multiple times during construction to make sure they function correctly.
Ensuring Durability Tactics
After designing your movable parts, it's important to guarantee they stand the test of time in your toy photography setups. Ensuring durability while maintaining functionality requires a few key tactics. Here's how you can do it:
- Use High-Quality Wood: Opt for hardwoods like oak or maple rather than softwoods like pine. Hardwoods are denser and more resistant to wear and tear, ensuring your props endure frequent adjustments and handling.
- Reinforce Joints and Connections: The joints and connections are often the weakest points. Strengthen them using wood glue in addition to screws or dowels. For parts that move, consider using small metal hinges or brackets to distribute the stress more evenly.
- Apply Protective Finishes: A good finish not only enhances the appearance but also adds a layer of protection. Use varnish, polyurethane, or even epoxy resin to seal the wood. This will protect it from moisture, scratches, and general wear, prolonging the life of your props.
Safety Considerations
When creating wooden props for toy photography, it's essential to keep safety at the forefront of your mind. First, always use protective gear like goggles and gloves when cutting or sanding wood. This keeps your eyes safe from sawdust and your hands from splinters or accidental cuts.
Ensure your workspace is well-ventilated, especially if you're using wood stains or adhesives that emit fumes. Inhaling these can be harmful, so a well-ventilated area or a mask is necessary. When selecting wood, avoid types that might splinter easily or have rough edges. Sand down all surfaces thoroughly to remove sharp edges that could damage your toys or injure your hands.
Pay close attention to the tools you're using. Keep them in good condition to prevent accidents. Dull tools require more force, increasing the risk of slips. Store them properly to avoid any unexpected injuries.
Lastly, be mindful of the finishes you apply. Non-toxic paints and sealants are essential, especially if children might handle the props. Safety isn't just about immediate hazards; it's about ensuring your props are safe for everyone in the long run. By taking these precautions, you'll create beautiful, safe, and functional props for your toy photography.
Display and Storage Tips
Displaying and storing your wooden props for toy photography can make a significant difference in the longevity and overall aesthetic of your collection. Proper care guarantees your props stay in top condition and are easily accessible for your next shoot.
- Use Shelving Units: Invest in sturdy shelving units to display your wooden props. Adjustable shelves let you customize the space for different-sized items, keeping everything organized and within reach. Plus, they add a professional touch to your display area.
- Climate Control: Wooden props can be sensitive to extreme temperatures and humidity. Store them in a climate-controlled environment to prevent warping, cracking, or other damage. A dehumidifier can be particularly useful if you live in a humid area.
- Protective Covers: Dust and dirt can accumulate over time, so use protective covers when your props aren't in use. Clear plastic bins or fabric covers can shield your items from dust while still allowing you to see what's inside.
At a Glance
You've now got the know-how to craft unique wooden props that enhance your toy photography. By choosing the right wood, mastering your tools, and paying close attention to design and finishing touches, you'll create pieces that add texture, depth, and realism. Remember to prioritize safety and proper storage to keep your props in top condition. With a bit of creativity and effort, your scenes will come to life in ways you never imagined. Happy crafting!


