
For fantastic outdoor toy photography, use natural light during golden hour for a warm, glowing effect by positioning toys to face the light source. Experiment with reflectors to fill in shadows and balance light, using different surfaces like silver or gold for varied results. Play with shadows to add depth and drama by shooting during times with extended, softer shadows. There's more to discover, so explore further to transform your toy photography.
Utilize Natural Light During Golden Hour
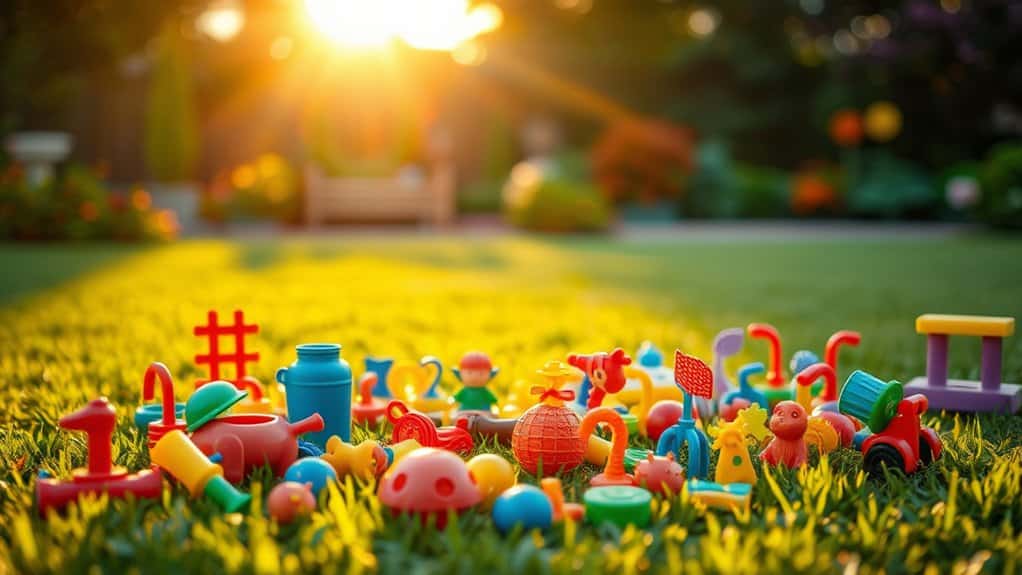
When capturing outdoor toy photography, taking advantage of natural light during the golden hour can elevate your images. This magical time, occurring shortly after sunrise or before sunset, offers soft, diffused light that enhances colors and textures without harsh shadows. Position your toys to face the light source for a warm, glowing effect that highlights details beautifully. Move around to find the best angles, allowing the light to wrap gently around your subject. You'll notice a dramatic difference, as the golden hour light adds depth and dimension. Don't rush; take your time to explore different compositions and perspectives. By harnessing this natural lighting, your toy photography will capture a mood that's both enchanting and professional, making your subjects truly stand out.
Experiment With Reflectors for Balanced Illumination
Reflectors are a fantastic tool to achieve balanced illumination in your outdoor toy photography. They help redirect natural light onto your subjects, filling in shadows and evening out the exposure. Start by experimenting with different reflector surfaces like white, silver, or gold to see which suits your scene best. White reflectors give a soft, natural look while silver adds a bit more contrast, and gold can add warmth.
Position your reflector opposite to the light source to bounce light back onto your toy, ensuring it's well-lit from all angles. Don't be afraid to move it around to find the best effect. Using a collapsible reflector makes it easy to carry and adjust. With practice, you'll find the perfect balance in your shots.
Harness Shadows for Dramatic Effects

Although light is essential in photography, shadows offer a unique opportunity to add drama and depth to your outdoor toy photos. By skillfully using shadows, you can create striking contrasts that enhance your toy's features and bring your images to life. To harness shadows effectively, consider these tips:
- Time of Day: Shoot during golden hour or late afternoon when shadows are longer and softer, adding intrigue without overwhelming your subject.
- Angles Matter: Experiment with different angles to see how shadows cast on your toy, emphasizing its contours and creating a sense of mystery.
- Background Play: Use textured or patterned backgrounds to see how shadows interact, adding an unexpected dimension to your shots.
- Silhouette Techniques: Position your toy against a strong light source, creating dramatic silhouettes that tell a story.
Frequently Asked Questions
How Can I Prevent Glare in My Outdoor Toy Photos?
To prevent glare in your outdoor toy photos, position yourself with the sun behind you or use a diffuser to soften sunlight. Avoid shooting during midday when the sun's harshest. Experiment with angles to minimize reflective surfaces.
What Types of Artificial Light Can Enhance Outdoor Toy Photography?
You can use LED panels, portable flash units, or ring lights to enhance your outdoor toy photography. These lights offer control over shadows and highlights, helping you achieve balanced illumination and more vibrant, detailed shots.
How Can I Protect My Camera Gear During Outdoor Shoots?
Think of your camera as a treasure. Use weather-resistant bags to shield it from rain, and lens caps to guard against dust. Keep silica gel packs handy for moisture. Your gear's safety guarantees stunning outdoor captures.
What's the Best Way to Photograph Toys in Rainy Weather?
When photographing toys in rainy weather, use a transparent umbrella to shield your camera and toys. Capture reflections in puddles for unique shots. Keep microfiber cloths handy to wipe any water droplets off your lens.
How Do I Choose the Right Background for Outdoor Toy Photography?
Consider colorful, enchanting backgrounds that complement your toy. Contrast with natural elements like lush leaves or rustic rocks. Guarantee the setting suits your scene, enhancing your toy's tale. Experiment with angles and light to achieve artistic allure.
At a Glance
You've now got the tools to elevate your outdoor toy photography from the mundane to the extraordinary. Embrace the magic of the golden hour, play with reflectors like a maestro, and let shadows whisper secrets into your shots. With these tips, you'll turn your little subjects into larger-than-life stories. So, grab your camera, step outside, and let your creativity take the stage. Your masterpiece awaits, and it'll be anything but ordinary.


