
When you're aiming to capture emotions in toy stories, mastering specific techniques is essential. Start by choosing toys with expressive features and customizing them to fit your narrative. Setting the scene with the right props and backdrops provides a rich context for your story. Lighting, camera angles, and dynamic poses all play pivotal roles in guiding your audience's emotional journey. Don't underestimate the power of color to evoke specific moods. Adding thoughtful props can deepen the narrative, and post-processing techniques will refine your visuals further. But how do these elements come together cohesively to captivate your audience?
Key Takeaways
- Use expressive faces and movable limbs on toys to convey dynamic emotions.
- Experiment with lighting to set the mood and enhance the story's emotional depth.
- Utilize close-up shots to highlight intricate facial expressions and emotions.
- Integrate warm and cool color tones to evoke specific feelings and atmospheres.
- Add relevant props and detailed settings to create an immersive and emotionally engaging scene.
Choosing the Right Toys
When it comes to choosing the right toys for storytelling, it's crucial to select ones that can evoke emotions and spark imagination. You want toys that aren't just visually appealing but also versatile in their roles. Think about dolls with expressive faces or action figures with movable limbs. These features let you create dynamic scenes and convey a range of emotions. For instance, Funko Pop! figures are popular collectibles that can serve multiple storytelling purposes.
Consider toys that can be easily personalized. Customizable elements, like interchangeable outfits or accessories, allow for a deeper connection and more engaging stories. For example, a simple teddy bear with a wardrobe of tiny clothes can transform from a brave explorer to a comforting friend, depending on your narrative.
Textures and materials matter too. Soft, plush toys can represent warmth and comfort, while rigid, plastic figures might symbolize strength or rigidity. Pay attention to these tactile elements as they can subtly influence the story's tone.
Lastly, don't overlook the importance of diversity. A collection of toys representing different genders, races, and backgrounds enriches your storytelling and makes it relatable to a broader audience. By thoughtfully selecting your toys, you set the stage for compelling stories filled with emotional depth.
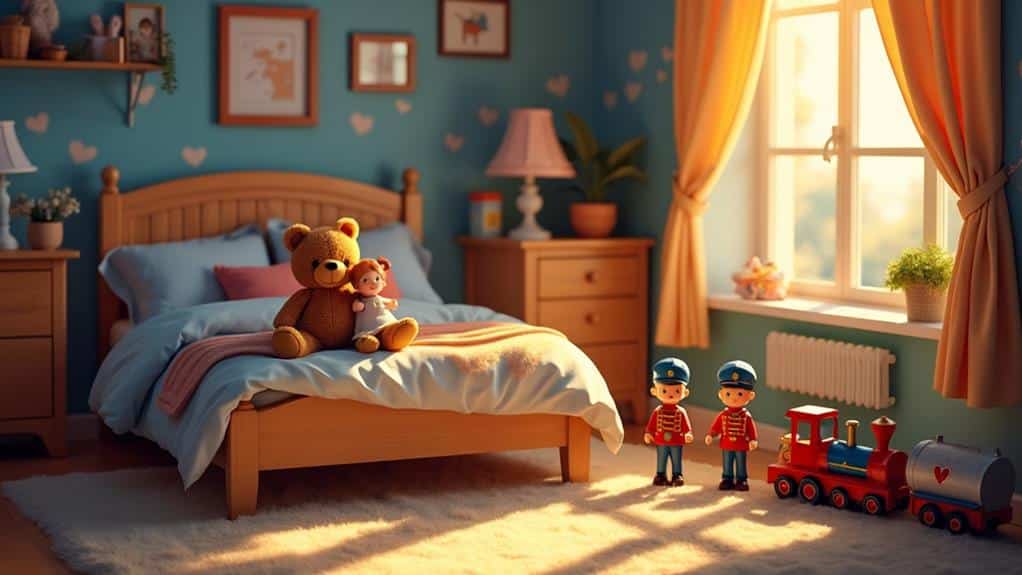
Setting the Scene
Creating an immersive environment for your toy stories is essential to captivate your audience. Start by envisioning the world your toys inhabit. Whether it's a bustling city, a mystical forest, or a cozy bedroom, the setting should complement the storyline and characters. Use props and backdrops that add depth and realism. For instance, small items like furniture, miniature plants, or even household objects can be repurposed to create an engaging scene. Experimenting with different textures and colors can further enhance the scene, helping to find the perfect background that fits the story.
Next, pay attention to the scale. Verify the proportions of the props match the toys to maintain believability. A well-scaled environment helps your audience feel like they're part of the story. Consider using natural elements like sand, water, or leaves to add texture and authenticity.
Don't forget about the details. Tiny touches like scattered toys, books, or even a spilled cup can make your scene more relatable and lifelike. Arrange these elements thoughtfully to guide the viewer's eye and highlight key aspects of the story.
Lastly, think about the mood you want to convey. The setting should evoke the right emotions, whether it's excitement, tranquility, or mystery. By carefully crafting your scene, you'll draw your audience into the world of your toy story
Utilizing Lighting Effects
After crafting a detailed and immersive setting, the next step is to harness the power of lighting effects to bring your toy story to life. Lighting isn't just about visibility; it sets the mood, highlights emotions, and adds depth to your scenes. Start by weighing the natural light sources in your setting. Is it a sunny day or a stormy night? Use soft, warm lighting for cheerful scenes and harsh, cool lighting for tense moments. Remember, lighting techniques enhance the mood and atmosphere of toy photography, making each scene more compelling.
Don't shy away from experimenting with shadows. Shadows can add mystery, highlight danger, or emphasize the scale of your toys. Position your light source at different angles to see how shadows fall and play with the sense of space. You can create dramatic effects using low-key lighting with strong contrasts between light and darkness.
Modifiers like diffusers and reflectors are your friends. A diffuser can soften harsh lights, making a scene feel more intimate. Reflectors bounce light back onto your subjects, filling in shadows and creating a more balanced image. Colored gels are another tool to ponder. They can change the mood entirely—red for intensity, blue for calmness, or green for an eerie atmosphere.
Mastering lighting effects will make your toy stories visually compelling and emotionally engaging
Exploring Camera Angles
To truly capture the essence of your toy stories, explore various camera angles that bring a fresh perspective to each scene. Start by experimenting with low angles, making your toys appear larger and more imposing. This technique can create a sense of awe and importance, drawing viewers into your miniature world. Consider using a macro lens to capture intricate details, making the scene more realistic and engaging.
Next, try high-angle shots to show vulnerability or isolation. When you look down on your toys from above, it can evoke feelings of smallness or loneliness, adding emotional depth to your story. Don't forget about eye-level shots, which create a relatable and balanced view, allowing the audience to connect directly with your characters.
Close-up shots are another powerful tool. By zooming in on a toy's face or details, you can highlight emotions and intricate features, making the scene more intimate and engaging. Wide shots, on the other hand, set the stage and provide context, showing the relationship between different elements in your scene.
Lastly, play with Dutch angles. Tilting the camera slightly can introduce a sense of tension or disorientation, perfect for dramatic moments. By thoughtfully choosing your camera angles, you'll enhance the storytelling and emotional impact of your toy scenes
Creating Dynamic Poses
While experimenting with different camera angles breathes life into your toy stories, the magic truly happens when your characters strike dynamic poses. These poses create a sense of movement and emotion, making your story more captivating. To start, think about the action your character is performing. Whether they're running, jumping, or simply reaching out, the pose should reflect their intent and energy. Weigh strategically placing props to add depth and context to the image, enhancing the overall storytelling.
Next, pay attention to lines and angles. Dynamic poses often utilize diagonal lines, which create a sense of motion and excitement. Avoid stiff, straight lines that can make your characters look unnatural or static. Instead, bend joints and tilt bodies to give a more fluid, lifelike appearance.
Don't forget to weigh balance. A well-balanced pose verifies that your character looks grounded and realistic. If they're in an action pose, think about how their weight is distributed. One leg might be bent while the other is extended, or arms might swing in opposite directions for balance.
Lastly, practice makes perfect. Experiment with different poses and see which ones work best for your story. Over time, you'll develop an eye for what makes a pose dynamic and compelling. Your toy stories will thank you for it.
Focusing on Facial Expressions
When focusing on facial expressions in toy stories, pay close attention to the eyes as they convey a range of emotions. Notice how different mouth shapes can set the mood, from a big grin to a slight frown. Don't overlook subtle brow movements; they can dramatically enhance the character's feelings.
Eyes Convey Emotions
Eyes are the windows to the soul, and nowhere is this more evident than in toy stories where facial expressions play a crucial role. When you're crafting your narrative, pay close attention to how a toy's eyes communicate emotions. A slight widening can show surprise, while drooping lids might convey sadness or exhaustion.
Don't underestimate the power of eye direction. Where a toy's gaze falls can tell the audience what it's focused on, whether it's another character, an object, or something off-screen that sparks curiosity or fear. Shifting eyes can suggest nervousness or deceit, adding layers to your storytelling.
Moreover, the size and shape of the pupils can indicate different feelings. Dilated pupils often signal excitement or attraction, whereas constricted pupils might suggest anger or discomfort. Altering these subtle elements can make your characters more relatable and expressive.
You can also use eyebrows to enhance the emotions conveyed through the eyes. Raised eyebrows can indicate shock or interest, while furrowed brows can express confusion or concern. By mastering these techniques, you'll bring your toy characters to life, making their emotions palpable and their stories more engaging.
Mouth Shapes Moods
Just as the eyes reveal so much about a toy's inner world, the mouth plays a vital role in shaping its moods. When you're animating toy stories, don't underestimate the impact of a toy's mouth shape. A simple tweak can transform a scene from cheerful to somber in an instant.
A wide, toothy grin exudes joy and excitement, while a slight upturn at the corners suggests contentment. On the flip side, a downturned mouth communicates sadness or disappointment. Even a tightly pressed, straight line can show determination or frustration. The subtleties in the mouth's curvature are your tools for conveying a spectrum of emotions.
For instance, when you want to show surprise, an open, round mouth paired with raised eyebrows can do wonders. If you're aiming for fear or shock, a gaping mouth accompanied by widened eyes creates a powerful effect. Pay attention to the slight details—like the tension in the lips or how open the mouth is—to make your toy characters more relatable and expressive.
Subtle Brow Movements
A toy's brow movements can be subtle yet incredibly powerful in conveying a wide range of emotions. When you animate a toy's eyebrows, even the slightest lift or furrow can transform a scene from joyous to sorrowful or from curious to confused. By mastering these nuanced movements, you'll breathe life into your characters, making them relatable and engaging.
Start by understanding the basic emotions tied to brow positions. Raised brows often indicate surprise, excitement, or curiosity, while furrowed brows can suggest confusion, anger, or concentration. To convey sadness, lower the brows slightly and angle them inward. For a joyful expression, raise the inner corners of the brows and relax the outer edges.
Pay close attention to the timing and coordination of these movements. A quick brow raise can suggest sudden surprise, while a slow, deliberate movement might convey deep thought or realization. Combined with other facial features, such as the eyes and mouth, these brow adjustments create a cohesive emotional expression.
Using subtle brow movements, you can add depth to your toy stories, making your characters' emotions clear and compelling. Practice these techniques, and you'll see a significant improvement in the emotional resonance of your animations.
Using Color to Evoke Mood
When you're telling a toy story, the colors you use can powerfully influence the mood. Warm tones like reds and yellows can evoke feelings of excitement and happiness, while cool tones such as blues and greens might convey calmness or sadness. Don't forget, using brightness and contrast effectively can make emotions pop and leave a lasting impact.
Warm Vs. Cool Tones
In the world of toy stories, the colors you choose are powerful tools that can shape the emotional landscape of your narrative. Warm tones, like reds, oranges, and yellows, evoke feelings of comfort, energy, and excitement. Think about a toy story set in a cozy, bustling playroom filled with vibrant, warm hues. These colors can make scenes feel inviting and alive.
On the flip side, cool tones—blues, greens, and purples—bring a sense of calm, mystery, or even sadness. Imagine a toy story unfolding in a serene underwater kingdom where cool blues and greens dominate the palette. These colors can create a tranquil or introspective mood, perfect for more reflective or somber moments.
Here's how you can use these tones effectively:
- Warm Tones for Action: Use warm colors to highlight moments of action or excitement. They can make scenes feel dynamic and full of life.
- Cool Tones for Reflection: Employ cool tones during quieter, more introspective scenes to evoke a sense of calm or contemplation.
- Balance Both: Mix warm and cool tones to create visual contrast, enhancing the emotional depth and complexity of your story.
Choosing the right color tones can make your toy story truly enchanting.
Brightness and Emotion
While the choice between warm and cool tones sets the emotional foundation of your toy story, brightness levels further refine your narrative's mood. Brightness can transform a scene from cheerful to somber with subtle adjustments. Using high brightness, you'll create an atmosphere of joy and energy. Bright, well-lit settings often evoke feelings of happiness and excitement, making them ideal for scenes where toys are celebrating or venturing on adventures.
On the other hand, lowering brightness can introduce a sense of mystery or melancholy. Dim lighting can make a scene feel more intimate or introspective, perfect for moments of reflection or sadness. Think about a toy sitting alone in a dimly lit room, conveying a sense of loneliness or contemplation.
You can also use varying brightness levels to guide your audience's emotional journey. Gradually increasing brightness can symbolize hope and positivity, while decreasing it can indicate tension or despair. By carefully adjusting the brightness, you control how your audience feels and experiences each moment in your toy story.
Contrast for Impact
To make your toy story visually compelling, using contrast effectively is essential. By playing with color contrasts, you can evoke specific moods and guide your audience's emotional response. Dark and light shades create a visual balance that grabs attention and highlights pivotal moments in your story.
- Warm vs. Cool Colors: Use warm colors like reds and oranges to convey warmth, excitement, or urgency. In contrast, cool colors like blues and greens evoke calmness, sadness, or mystery. For instance, a toy's adventure in a vibrant, warm-colored forest feels energetic, while a scene in a cool-colored underwater world feels serene or eerie.
- High vs. Low Saturation: High saturation, with bold, vivid colors, signals intensity and drama. Low saturation, with muted or pastel tones, suggests subtlety and tranquility. A toy's triumphant moment bursting with high saturation can be contrasted with a reflective scene in low saturation to emphasize the shift in mood.
- Complementary Colors: Colors opposite each other on the color wheel, like blue and orange, create strong visual interest and tension. Using complementary colors can make scenes more dynamic and emotionally charged, emphasizing key story moments.
Adding Props for Depth
Props can transform a toy story from a simple narrative into a rich, immersive experience. When you introduce props, you're not just adding objects; you're creating context and setting the scene. Imagine a toy soldier standing alone versus one surrounded by tiny sandbags and a miniature flag. The latter tells a complete story, evoking emotions and sparking imagination.
Start with small, relevant items that enhance the story's theme. For a tea party scene, include mini teacups, plates, and perhaps a small tablecloth. These items help viewers believe in the world you're creating. Props should be thoughtfully chosen to avoid clutter and maintain focus on the main characters.
Use props to highlight the emotional tone of your story. Soft, plush toys on a cozy blanket can evoke warmth and comfort, while scattered, broken items can convey chaos or sadness. The key is to verify that every prop serves a purpose and adds to the narrative.
Experiment with different arrangements and compositions. Move props around to see how they change the mood and depth of the scene. By carefully integrating props, you'll enrich your toy stories, making them engrossing and emotionally resonant.
Post-Processing Techniques
Post-processing techniques can dramatically elevate your toy stories, adding polish and a professional touch. By refining your images with these methods, you can highlight emotions, enhance colors, and bring out the best in your scenes. Three key techniques warrant examination:
- Color Correction and Grading: Adjust the colors to match the mood you're aiming for. Warmer tones can evoke nostalgia, while cooler tones can give a sense of calm or sadness. Use tools like Lightroom or Photoshop to fine-tune the hue, saturation, and luminance of your shots.
- Sharpening and Noise Reduction: Toys often have intricate details that need to stand out. Sharpening your images can help highlight these details, while noise reduction verifies that your photos look clean and professional. Be careful not to overdo it, as excessive sharpening can make the image look unnatural.
- Vignetting and Blurring: Direct the viewer's attention to the focal point of your story by adding a subtle vignette or applying a blur to the background. This technique can create depth and isolate your main subjects, making them pop against the backdrop.
Storyboarding Your Shots
When storyboarding your shots, focus on the basics of shot composition to set the scene effectively. Use different angles to convey emotions and enhance your toy story's narrative. Remember, even small changes in perspective can substantially impact how your audience feels.
Shot Composition Basics
Understanding shot composition basics is essential for bringing your toy stories to life. It's the foundation of visually engaging storytelling. By mastering these basics, you'll guide your audience's eyes and emotions through each scene. Here are the three key elements you should focus on:
- Rule of Thirds: Imagine your frame divided into nine equal parts by two equally spaced horizontal lines and two equally spaced vertical lines. Position your main subjects along these lines or at their intersections to create balance and interest.
- Leading Lines: Use lines within your scene to direct the viewer's attention to your subject. Whether it's a road, a row of toys, or even the angle of a toy's arm, leading lines help create depth and focus.
- Framing: Surround your subject with elements in the scene to create a "frame within a frame." This technique draws attention to the subject and adds layers to your composition. Think of doorways, windows, or tree branches as natural frames.
Emotion Through Angles
Capturing emotion in your toy stories often hinges on the angles you choose for your shots. Think about how you want your audience to feel. A low angle looking up at a toy can make it seem powerful and dominant, while a high angle looking down can make the same toy appear vulnerable or insignificant. By simply changing your camera's position, you're able to communicate a wide range of emotions.
Close-ups are another powerful tool. They allow you to capture minute details, like the expression on a toy's face or the texture of its surface. Use these shots to convey intimacy or intensity. Conversely, wide shots can set the scene and provide context, making the viewer feel part of a larger world.
Don't forget about the Dutch angle. Tilting your camera slightly can create a sense of unease or disorientation, perfect for tense or dramatic moments.
Storyboarding your shots before you start can help you plan these angles effectively. Sketch out each scene and decide which angles best convey the emotions you want to express. By being intentional with your angles, you'll create a more compelling and emotionally rich toy story.
At a Glance
By employing these 10 essential techniques, you'll capture powerful emotions in your toy stories. Remember to choose expressive toys, set immersive scenes, and master lighting. Experiment with camera angles and dynamic poses to guide your audience's emotions. Use color to set the mood and props to add depth. Post-process your shots for refinement and storyboard your sequence for a cohesive narrative. These steps will guarantee your toy stories captivate and resonate with your audience.


